You are using an out of date browser. It may not display this or other websites correctly.
You should upgrade or use an alternative browser.
You should upgrade or use an alternative browser.
CH->CG Rear End Conversion
- Thread starter Skippy
- Start date
")
") I've seen a conversion like this before. But pics are on my desktop PC... will try and find them for you!
I've seen a conversion like this before. But pics are on my desktop PC... will try and find them for you!
D
Deleted member 9616
Guest
I'm interested in doing this to my CH so I can fit the tail lights I bought as didn't know there was a slight shape difference between the CG and CH
Amber2310
New Member
Did you do it skippy? Keen too see results almost ten yrs later.. @Magnats I might be able to recruit Mike to do it for me
@Ian yeah I'll let you know when I get going on it!


Did you do it skippy? Keen too see results almost ten yrs later.. ♀
Hi Amber,
Skippy hasnt been online since Feb, but he never ended up doing the conversion, or at least never documented it on the forum. Its still unknown grounds to change the rear end.
Zombait Manny
New Member
Glad to see someone actually did thisCan confirm, CG onto CH fits! You need the boot lid, bumper, lights and parts of the loom (indicator plugs and rewire plate lights), otherwise a direct swap.
Zombait Manny
New Member
From memory the cg lights were different shape at the bottom or inner sides.How much difference is there between the cg and ch tail lights?
Blue_Streak94
Member
It's just a different boot and bumper they just bolt on, nothing needs to be cut or welded, cg and ch Lancers are the same carDid you do it skippy? Keen too see results almost ten yrs later..
Zombait Manny
New Member
Lights are slightly different as is the harness, but if you throw the CG lights in and are handy with wiring it shouldn't take more than an hour to swap it all over and wire it up.It's just a different boot and bumper they just bolt on, nothing needs to be cut or welded, cg and ch Lancers are the same car
Blue_Streak94
Member
Yes I know, but the over all body is exactly the sameLights are slightly different as is the harness, but if you throw the CG lights in and are handy with wiring it shouldn't take more than an hour to swap it all over and wire it up.
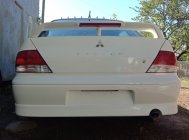
Ok, here is the way you convert CH->CG rear, you will need:
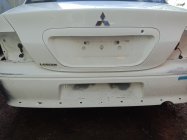
CG Bootlid
CG Tailights
CG Rear bumper (ES or VRX)
10mm socket and wrench
flat blade screwdriver
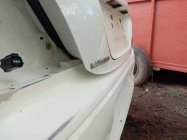
I know the bumper in the photos looks terrible, but its had repairs done where the guy didnt care how he took it off the car, so its been fully repaired with a heat gun and is ready for a sand down and paint, but that doesnt matter for this post and conversion, it wil; be resprayed as will the bootlid.
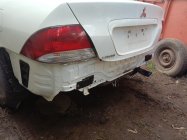
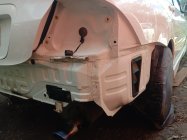
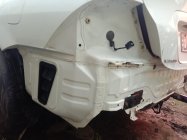
To remove the CH bumper you need to undo the screws at each end of the bumper and the plastic mudflap retaining clips, these can be taken out by using a fine flat blade screwdriver and pressing into both edges, next you to pull the plastic trim away from the latch area, there a 4 nuts you need to undo these hold the rear support to the bumper, in the CH boot on each side of the boot trim you will notice a round section of trim if you lift this up it gives you access to the 10mm bolts that holds the middle section of the bumper.
Under the bumper there are 2 plastic retaining clips that also need to be removed, take these out.
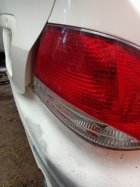
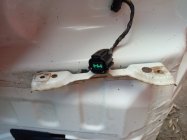
Remove the CH tailights, when you take the CH lights out you will see a 10mm bolt and a plastic retaining clip, take these out.
The bumper should now be able to be removed.
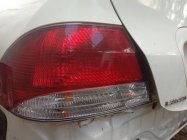
There are a few things you will need to correct, these are the square plastic clip near the rear wheels ensure this flat, the 2 tabs under the tailights also need to be raised up so its level, the CH angle is down alittle, CG is dead flat, just give this a light tap with a hammer or gently pull it up so its level.
I have attached a photo of the CG tailight and CH bootlid showing the angle difference between CG and CH.
Bolt the CG bumper into place and do the reverse of the CH removal, clips, bolts etc, insert the tailights and screw these in places.
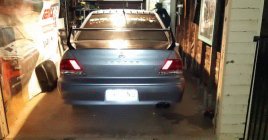
NOTE: if at any stage you need to stop, you CAN leave the CH bootlid on just be aware of that.
Before you remove the bootlid, disconnect the release cable and pull this through and let it lay in the boot area, the wire connector on the latch you can remove by using a fine flat blade and lift the holder up then pull it back to remove it, undo the plastic clips inside the bootlid and pull the wiring through, you should now be able to remove the bootlid (4x 10mm bolts).
Put the CG bootlid on and bolt it in place (DO NOT CLOSE IT YET), run the release cable to the latch and wiring and hook the connector as you removed it from the CH bootlid.
There is another change you are going to have to make, the key barrel on the CG is different to the CH barrel, so you will need to see a locksmith and get your CG barrel keyed to your keys, you cant use the CH barrel.
You will also need to make up a small wiring loom from the number plate light wires and run this to the lower bumper to get the number plate lights to work.
We've done this conversion today and she's almost ready for a full respray, but the conversion was pretty straight forward and faster than i thought it was, just have to get the barrel keyed and its done!.
enjoy
CG Bootlid
CG Tailights
CG Rear bumper (ES or VRX)
10mm socket and wrench
flat blade screwdriver
I know the bumper in the photos looks terrible, but its had repairs done where the guy didnt care how he took it off the car, so its been fully repaired with a heat gun and is ready for a sand down and paint, but that doesnt matter for this post and conversion, it wil; be resprayed as will the bootlid.
To remove the CH bumper you need to undo the screws at each end of the bumper and the plastic mudflap retaining clips, these can be taken out by using a fine flat blade screwdriver and pressing into both edges, next you to pull the plastic trim away from the latch area, there a 4 nuts you need to undo these hold the rear support to the bumper, in the CH boot on each side of the boot trim you will notice a round section of trim if you lift this up it gives you access to the 10mm bolts that holds the middle section of the bumper.
Under the bumper there are 2 plastic retaining clips that also need to be removed, take these out.
Remove the CH tailights, when you take the CH lights out you will see a 10mm bolt and a plastic retaining clip, take these out.
The bumper should now be able to be removed.
There are a few things you will need to correct, these are the square plastic clip near the rear wheels ensure this flat, the 2 tabs under the tailights also need to be raised up so its level, the CH angle is down alittle, CG is dead flat, just give this a light tap with a hammer or gently pull it up so its level.
I have attached a photo of the CG tailight and CH bootlid showing the angle difference between CG and CH.
Bolt the CG bumper into place and do the reverse of the CH removal, clips, bolts etc, insert the tailights and screw these in places.
NOTE: if at any stage you need to stop, you CAN leave the CH bootlid on just be aware of that.
Before you remove the bootlid, disconnect the release cable and pull this through and let it lay in the boot area, the wire connector on the latch you can remove by using a fine flat blade and lift the holder up then pull it back to remove it, undo the plastic clips inside the bootlid and pull the wiring through, you should now be able to remove the bootlid (4x 10mm bolts).
Put the CG bootlid on and bolt it in place (DO NOT CLOSE IT YET), run the release cable to the latch and wiring and hook the connector as you removed it from the CH bootlid.
There is another change you are going to have to make, the key barrel on the CG is different to the CH barrel, so you will need to see a locksmith and get your CG barrel keyed to your keys, you cant use the CH barrel.
You will also need to make up a small wiring loom from the number plate light wires and run this to the lower bumper to get the number plate lights to work.
We've done this conversion today and she's almost ready for a full respray, but the conversion was pretty straight forward and faster than i thought it was, just have to get the barrel keyed and its done!.
enjoy
Attachments
-
 IMG_20240521_144503.jpg3.1 MB · Views: 6
 -
 IMG_20240521_140603.jpg2.9 MB · Views: 6
 -
 IMG_20240521_135531.jpg2.6 MB · Views: 5
 -
 IMG_20240521_140553.jpg2.6 MB · Views: 5
 -
 IMG_20240521_135540.jpg2.6 MB · Views: 5
 -
 IMG_20240521_133839.jpg3.1 MB · Views: 4
 -
 IMG_20240521_133230.jpg2.5 MB · Views: 4
 -
 IMG_20240521_133219.jpg2.8 MB · Views: 3
 -
 IMG_20240521_130244.jpg2.5 MB · Views: 5
 -
 IMG_20240521_130236.jpg2.5 MB · Views: 6