tryg
New Member
A lot of people ask me what my car was/is. It is a built up from stock CVT 2.0 ES. Nothing special.
Then the question is how, how much, how long... I thought I would start a CJ thread going through each of the mods, in the order I did them, how much I found them for (realistically achievable by all) and how they made me feel about the car.
I did all my mods over an 18-month period, spending about $12K all up, but when you think I only spent $15K on the car to begin with (year old, from auction, with 18,000km), then its really only VR prices...
Here is a total list of mods thus-far.
List of mods:
from bog stock CVT ES;
Exterior-
18" VRX wheels
X-Factor copies of OEM side skirts and airdams
Fogs
Chrome fog rings
boot lip (guerney)
Billet fuel door
LED taillights
illuminated front Mitsu emblem
X-Factor widow visors
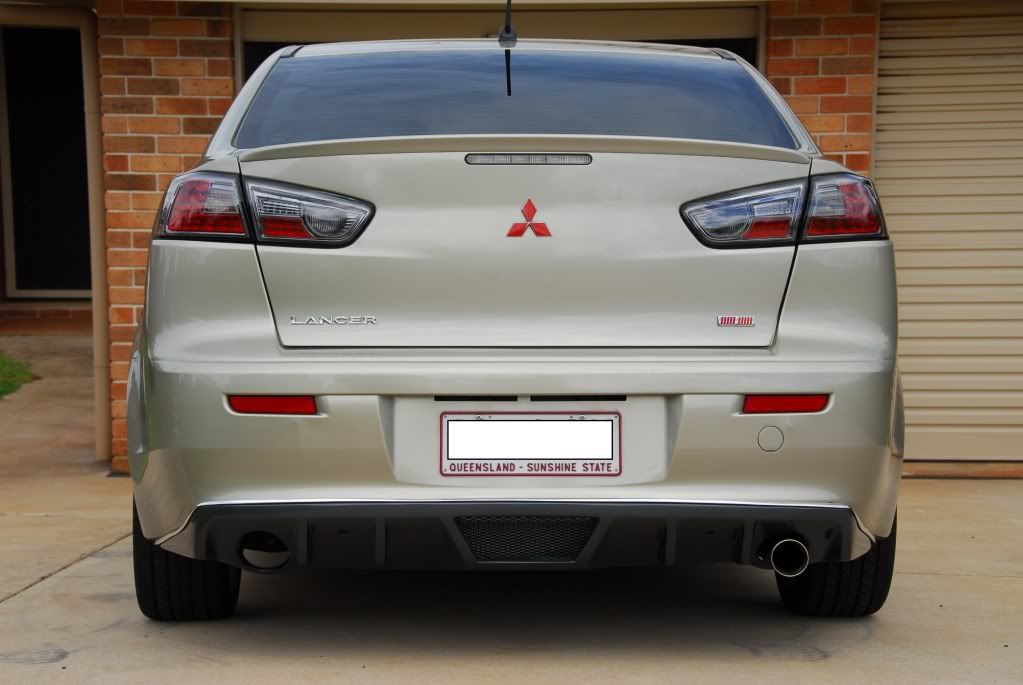
Talon rear diffuser
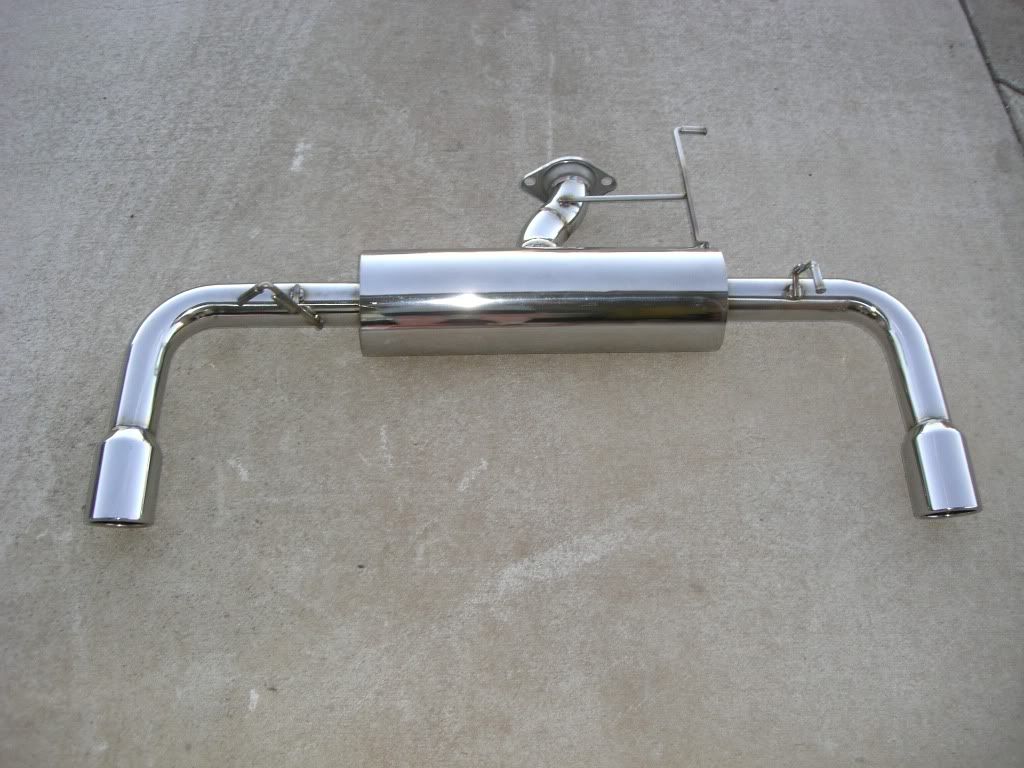
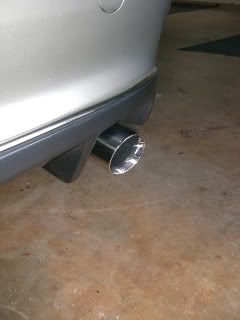
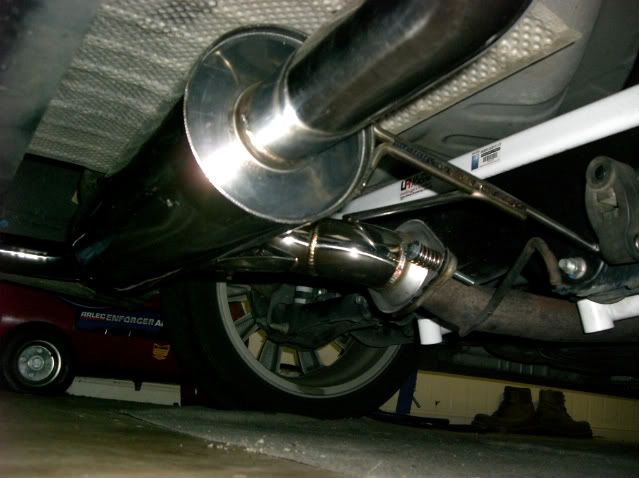
RPW twin stainless exhaust
Chrome lip and diffuser striping
blacked out nose
bolle-branded tint
go-fast ralliart badging
2" Perrin shorty
red decals for mitsu emblems
Bosch Aerotwin wipers
Interior-
7" Kenwood dvd (with digital tv receiver and gps nav module)
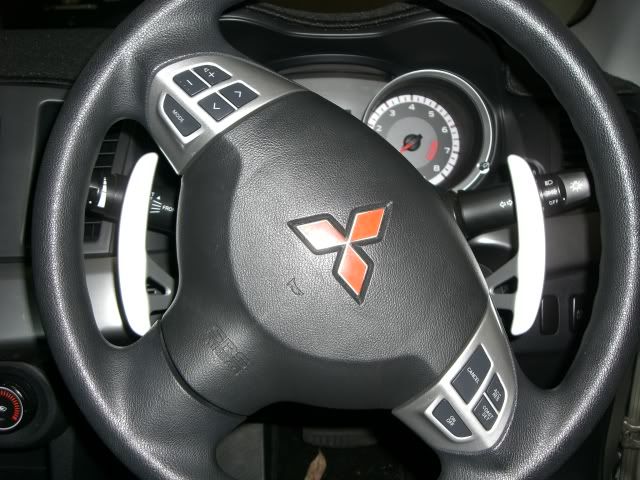
flappy paddles
9" dvd leather headrests
ipod dock
500gb hdd for kenwood
dashmat
leather wheel with bluetooth controls (from Outlander)
audio controls added
Polk momo bridged 4-channel amp for front speakers
Polk momo bridged 4-channel amp for rear speakers
Kenwood 1800w mono-block digital amp for sub
Polk MM front splits
Polk MM rear coax
Polk MM 12" sub
dynamat everywhere!!!
floor mats
stainless door sills
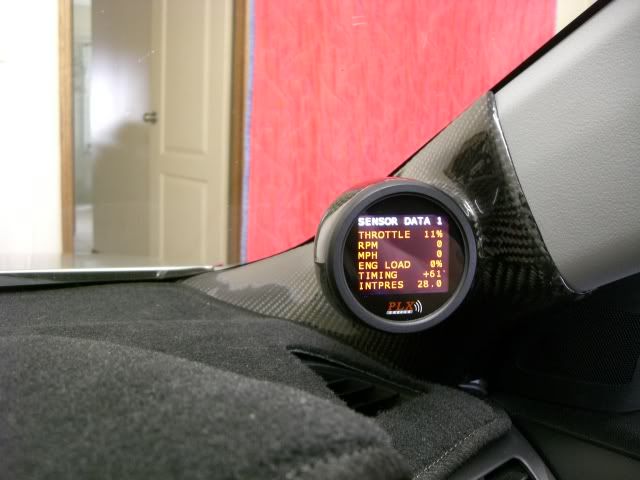
CF pillar gauge mount
PLX colour LCD screen multi OBD gauge
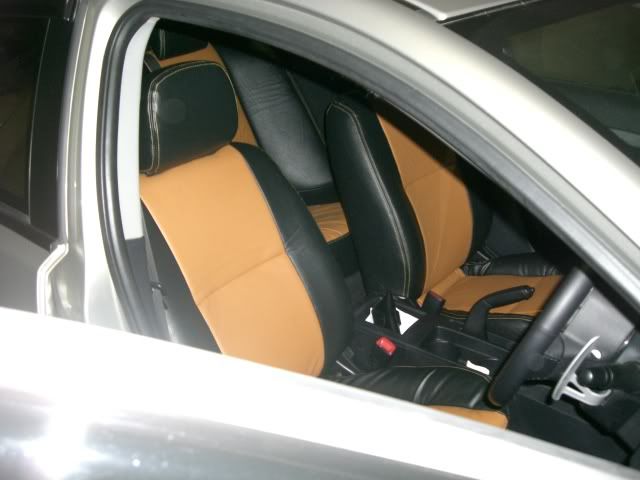
Leather seat re-trim in tiger and black
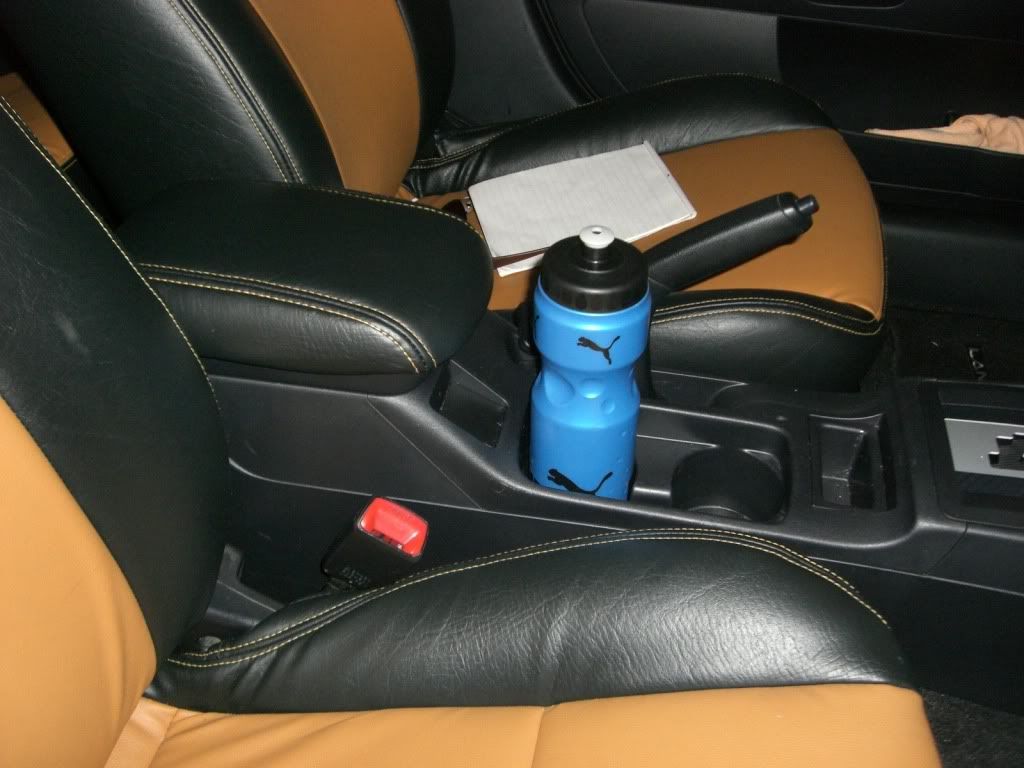
VR Lancer centre console with arm rest, trimmed in black leather
Performance mods-
RA air intake
RA twin pot front calipers
DBA 4000 series Club T3 slotted rotors
Braided brake lines
Bendix Ultimates
K&N filter
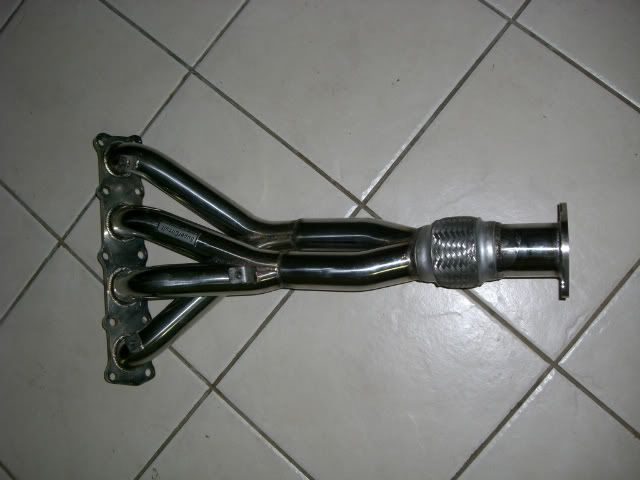
Super Circuit headers
RPW twin 2.5" stainless zorst
Ultra Racing bars; 9 in total
Kings superlow rear
Kings low front
XZ series Whiteline sways front and rear
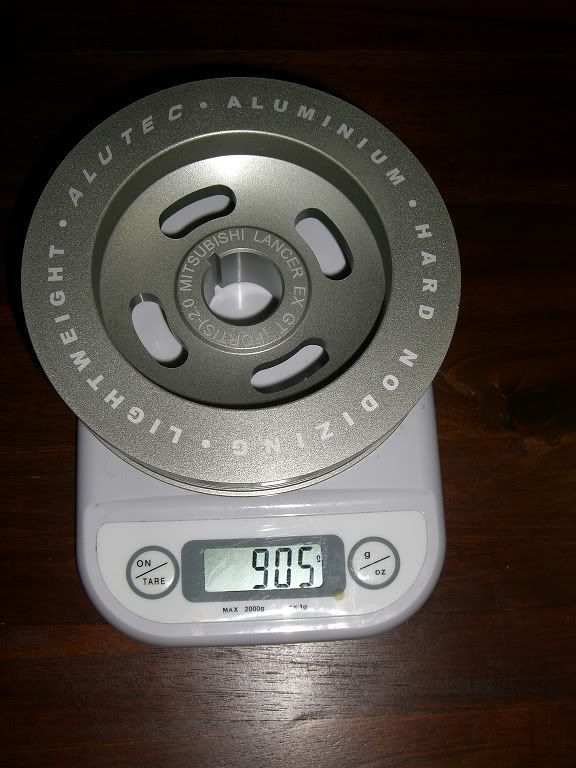
Alutec lightweight crank pulley
Other stuff-
stainless gas bonnet struts
painted engine covers
Philips Crystal vision bulbs all around
Spirit of Competition sticker
Vinyl spats
All of my mods were done by myself, at home, with a modest range of tools... but I would like to think a great deal of knowhow. Never cutting safety corners or damaging my car.
The majority of my mods were found on eBay (or could be found on eBay) for the same prices as other clubs' fantastic group buys that take too much time and ultimately have deprived people of money, when stolen...
All but a few of these mods are simple, can-do types that all would enjoy. I believe my starting point was a modest 'mum's taxi' type of car that was begging for something to be done. Keeping a good eye on the eBay pages every week, I found most of my stuff either second hand or imported at a fraction of the price of OEM Mitsu or Australian-landed products. A bit of luck never hurts either...!
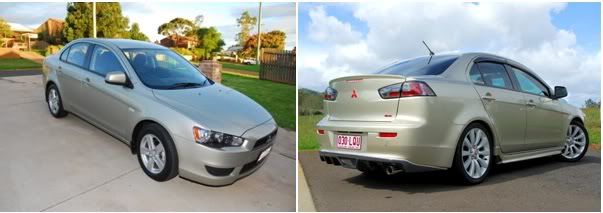
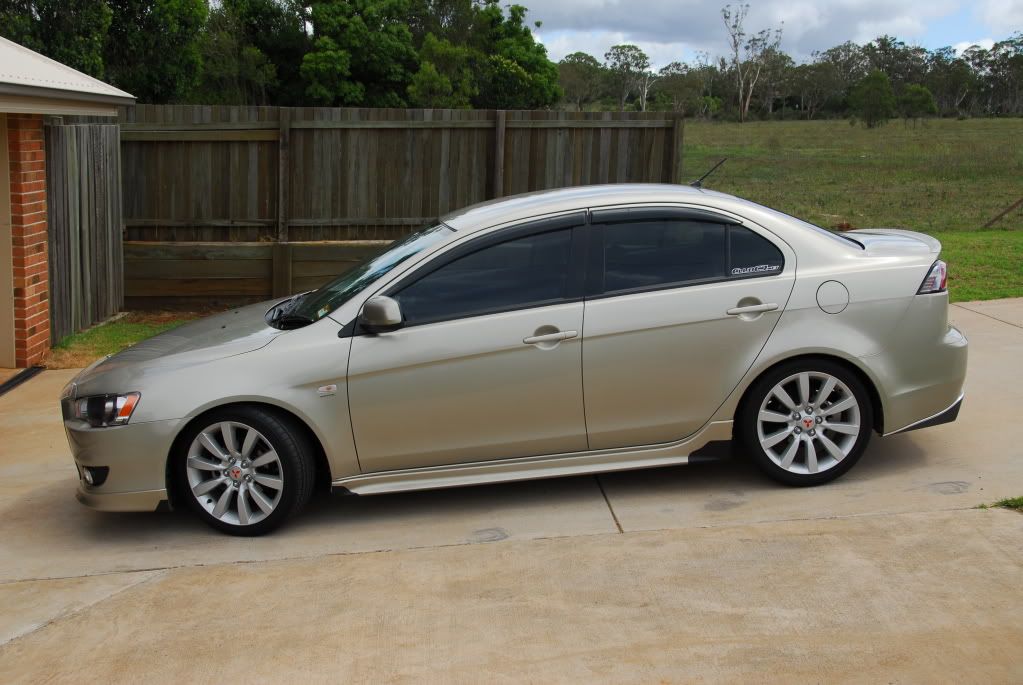
Here is a pic of the start and what it looks like now:
I was fortunate to get the 16" wheels and a full-sized spare when purchased, but nothing else was done to the car...
I found a Ralliart driver selling his wheels on eBay for $500, with excellent rubber, that I am still using. He must have changed wheels almost immediately, putting on 19" wheels. So, for $500 I had RA/VRX wheels. My rubber sold for $450, that leaves a total cost of $50 for the wheels. That was my first mod.
Secondly, I had a tint done. Now you can scrimp or spend on a tint. Personally I bought the lifetime warranted Bolle brand tint from 3M. It is a good looking metalised tint film that is very optically clear and looks good. Not too dark. Spend what you want to, but the tint was my second mod.
Because I had no exterior body kit parts, I sourced a boot lip spoiler (not a fan of wings) for a bargain price of $130, painted. That was my third mod.
Then, I found a website in Singapore, that sells complete painted OEM-style body kits, at a fraction of the price of factory. I bought the VRX front and side moldings, $480 delivered. My fourth set of mods.
After that, I bit the bullet and bought a factory set of fog lamps, to make it even more VRX style. I didnt pay $500 plus, but ordered it from the US, via Mitsubishi dealer. I installed it myself and had it flashed. Simple.
Everyone was doing it, so I also then did the nose centre black-out and chrome trim, total cost of $40.
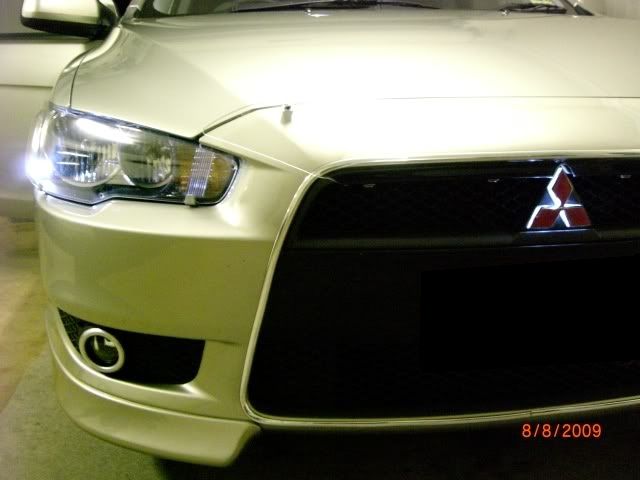
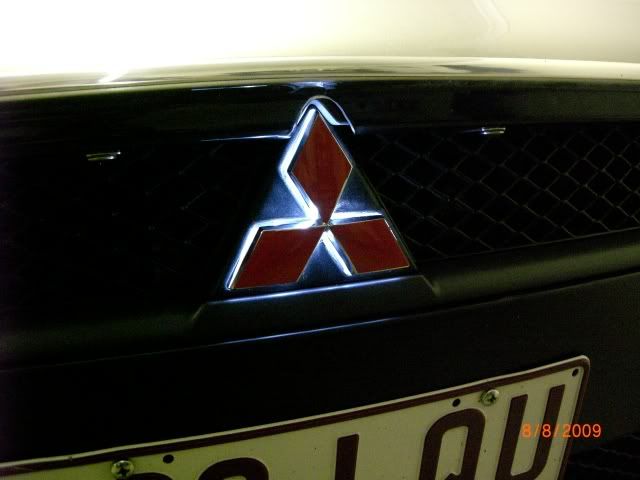
I was not happy being very similar to all others, so I cut out some red decal and stuck over the chrome Mitsu emblem, I also cut out the front emblem and illuminated it, using 5mm perspex and some LEDs, a relay and a switch. I still have not seen another yet around Brisbane or Toowoomba, its a neat stand-out at night. Lots of comments. Total cost $8!
As is popular, I de-badged the car and added some Ralliart-inspired badging.. not everyone's taste but its cheap to do.
Then I bought some King Springs, low front and superlow rear, $270 total. Installation took 4 hours on my own. Great end result and handling is so much better.
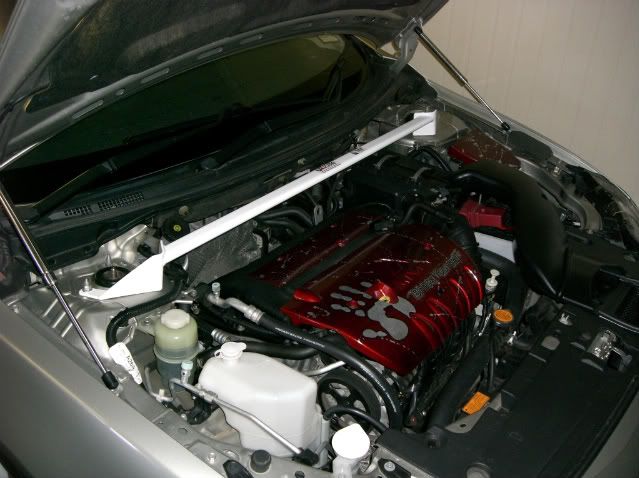
I painted my engine bay, added some chrome gas struts and a tower bar, all up $240. GIves the engine bay a good look.
Did the cheap breathing mod, added an RA intake and K&N filter, total $250. Has helped a lot.
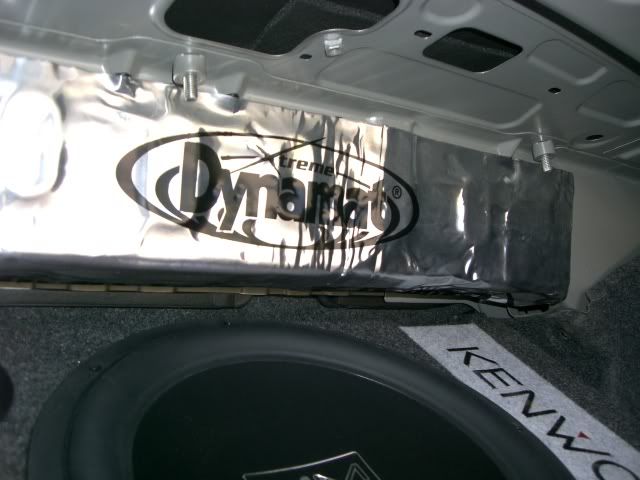
I took the opportunity to Dynamat the entire inside of the car, except the roof, as I was installing a bigger stereo with sub, total cost $550 (probably overdone but a great result).
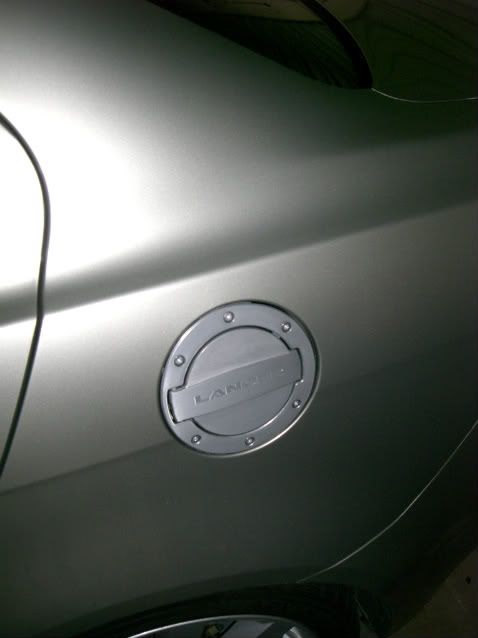
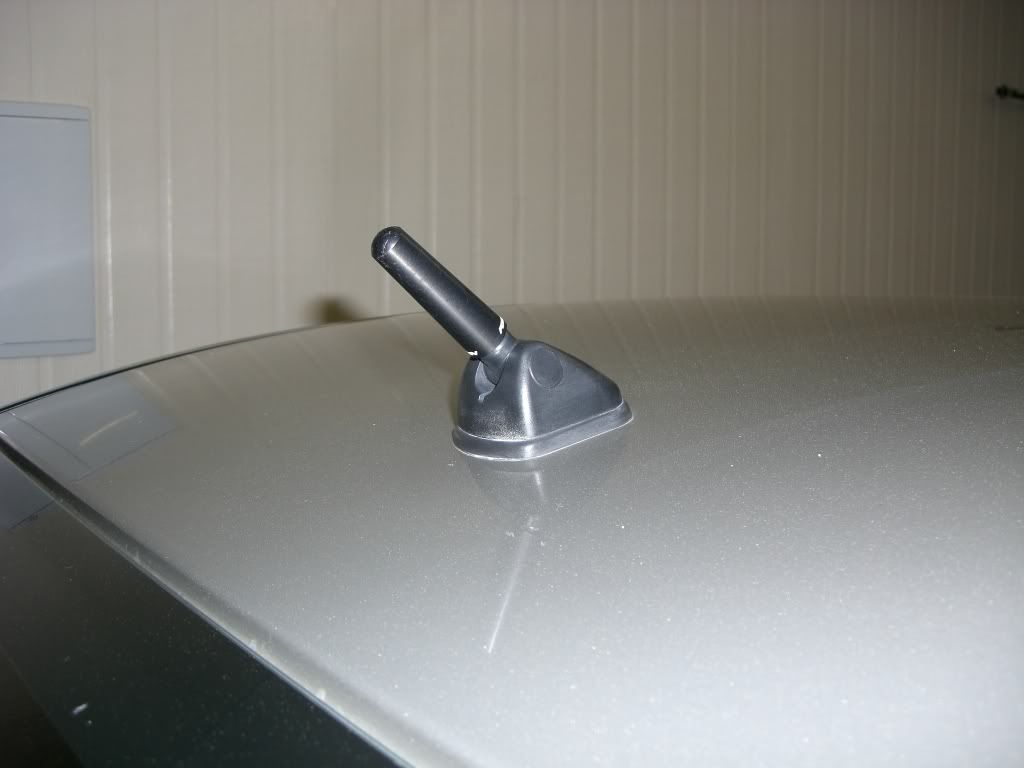
Couple of rainy-day simple mods were the shorter antenna and billet fuel filler, total $185.
Stereos are a personal choice, not saying mine is elite or ultimate.. just to my taste. I bought a 7" TV DVD GPS Kenwood with Polk amps, splits, coax and sub.

Exhaust was replace and headers installed. Total $950
I finished the look with a rear diffuser and some added chrome trim. Total $440
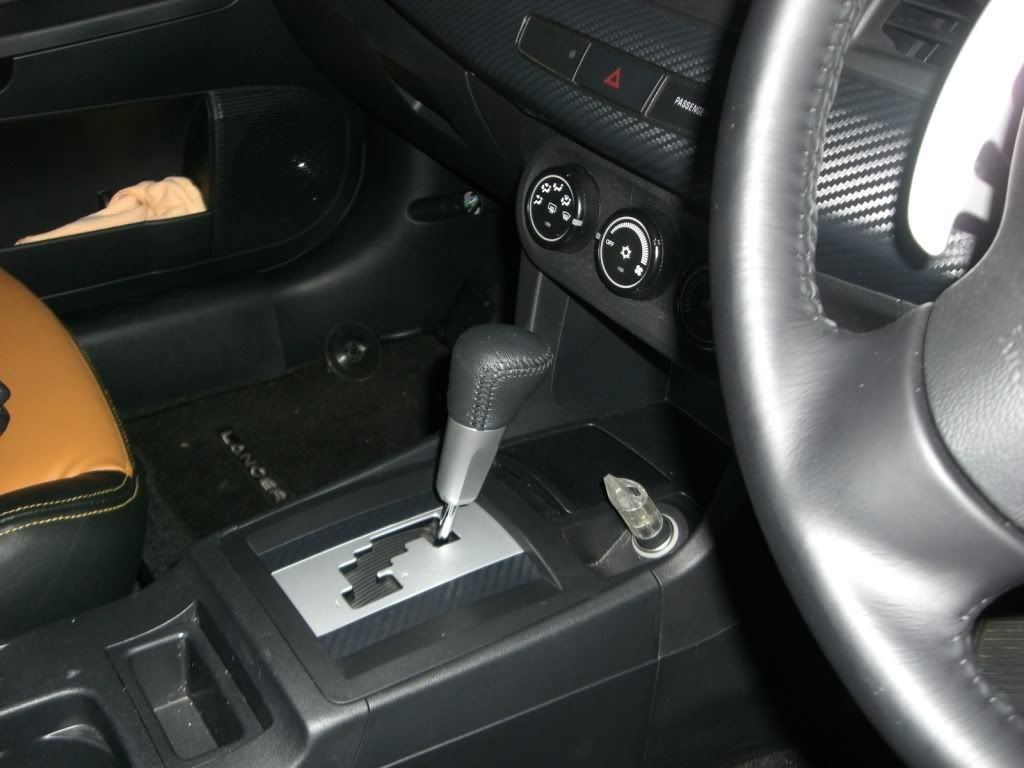
I bought and installed flappy paddles $250, a leather steering wheel ($50 new, but the find of the century), audio controls $100, PLX OBD gauge and CF holder $320 and full leather seat retrims $595 (cheap if you install yourself).

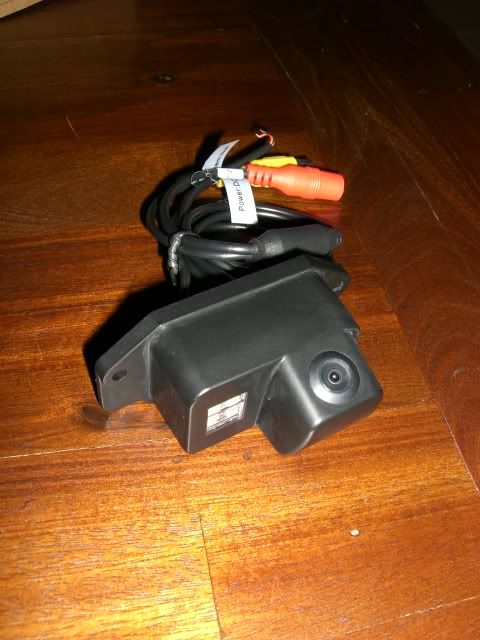
Some other mods along the way; LED Taillights $420, reversing tv camera $35, lightened crank pulley $165, lots of Ultimate Racing bars for anti twist/sway. Whiteline XZ series sway bars, (excellent mod, bit tricky to fit front) $440.
I also have braided brake lines, some CF film decals in the interior, iPhone charging holder/transfer cable to my stereo, 500Gb HDD for stereo, chrome fog rings, bigger catalytic converter and mid-pipe (only thing to be manufactured for me, which I did not fit), a stage 1 RPW tune, some uprated bulbs etc..
One of the most satisfying things is that all but one of the mods were done without any assistance from mechanics or others. This has kept the costs low and the amount of mods that I was able to do high.... if you cannot do them yourself, then don't, but there are very talented members on this site who might be able to assist.
I think having a base model is not the end of the world!
Then the question is how, how much, how long... I thought I would start a CJ thread going through each of the mods, in the order I did them, how much I found them for (realistically achievable by all) and how they made me feel about the car.
I did all my mods over an 18-month period, spending about $12K all up, but when you think I only spent $15K on the car to begin with (year old, from auction, with 18,000km), then its really only VR prices...
Here is a total list of mods thus-far.
List of mods:
from bog stock CVT ES;
Exterior-
18" VRX wheels
X-Factor copies of OEM side skirts and airdams
Fogs
Chrome fog rings
boot lip (guerney)
Billet fuel door
LED taillights
illuminated front Mitsu emblem
X-Factor widow visors
Talon rear diffuser
RPW twin stainless exhaust
Chrome lip and diffuser striping
blacked out nose
bolle-branded tint
go-fast ralliart badging
2" Perrin shorty
red decals for mitsu emblems
Bosch Aerotwin wipers
Interior-
7" Kenwood dvd (with digital tv receiver and gps nav module)
flappy paddles
9" dvd leather headrests
ipod dock
500gb hdd for kenwood
dashmat
leather wheel with bluetooth controls (from Outlander)
audio controls added
Polk momo bridged 4-channel amp for front speakers
Polk momo bridged 4-channel amp for rear speakers
Kenwood 1800w mono-block digital amp for sub
Polk MM front splits
Polk MM rear coax
Polk MM 12" sub
dynamat everywhere!!!
floor mats
stainless door sills
CF pillar gauge mount
PLX colour LCD screen multi OBD gauge
Leather seat re-trim in tiger and black
VR Lancer centre console with arm rest, trimmed in black leather
Performance mods-
RA air intake
RA twin pot front calipers
DBA 4000 series Club T3 slotted rotors
Braided brake lines
Bendix Ultimates
K&N filter
Super Circuit headers
RPW twin 2.5" stainless zorst
Ultra Racing bars; 9 in total
Kings superlow rear
Kings low front
XZ series Whiteline sways front and rear
Alutec lightweight crank pulley
Other stuff-
stainless gas bonnet struts
painted engine covers
Philips Crystal vision bulbs all around
Spirit of Competition sticker
Vinyl spats
All of my mods were done by myself, at home, with a modest range of tools... but I would like to think a great deal of knowhow. Never cutting safety corners or damaging my car.
The majority of my mods were found on eBay (or could be found on eBay) for the same prices as other clubs' fantastic group buys that take too much time and ultimately have deprived people of money, when stolen...
All but a few of these mods are simple, can-do types that all would enjoy. I believe my starting point was a modest 'mum's taxi' type of car that was begging for something to be done. Keeping a good eye on the eBay pages every week, I found most of my stuff either second hand or imported at a fraction of the price of OEM Mitsu or Australian-landed products. A bit of luck never hurts either...!
Here is a pic of the start and what it looks like now:
I was fortunate to get the 16" wheels and a full-sized spare when purchased, but nothing else was done to the car...
I found a Ralliart driver selling his wheels on eBay for $500, with excellent rubber, that I am still using. He must have changed wheels almost immediately, putting on 19" wheels. So, for $500 I had RA/VRX wheels. My rubber sold for $450, that leaves a total cost of $50 for the wheels. That was my first mod.
Secondly, I had a tint done. Now you can scrimp or spend on a tint. Personally I bought the lifetime warranted Bolle brand tint from 3M. It is a good looking metalised tint film that is very optically clear and looks good. Not too dark. Spend what you want to, but the tint was my second mod.
Because I had no exterior body kit parts, I sourced a boot lip spoiler (not a fan of wings) for a bargain price of $130, painted. That was my third mod.
Then, I found a website in Singapore, that sells complete painted OEM-style body kits, at a fraction of the price of factory. I bought the VRX front and side moldings, $480 delivered. My fourth set of mods.
After that, I bit the bullet and bought a factory set of fog lamps, to make it even more VRX style. I didnt pay $500 plus, but ordered it from the US, via Mitsubishi dealer. I installed it myself and had it flashed. Simple.
Everyone was doing it, so I also then did the nose centre black-out and chrome trim, total cost of $40.
I was not happy being very similar to all others, so I cut out some red decal and stuck over the chrome Mitsu emblem, I also cut out the front emblem and illuminated it, using 5mm perspex and some LEDs, a relay and a switch. I still have not seen another yet around Brisbane or Toowoomba, its a neat stand-out at night. Lots of comments. Total cost $8!
As is popular, I de-badged the car and added some Ralliart-inspired badging.. not everyone's taste but its cheap to do.
Then I bought some King Springs, low front and superlow rear, $270 total. Installation took 4 hours on my own. Great end result and handling is so much better.
I painted my engine bay, added some chrome gas struts and a tower bar, all up $240. GIves the engine bay a good look.
Did the cheap breathing mod, added an RA intake and K&N filter, total $250. Has helped a lot.
I took the opportunity to Dynamat the entire inside of the car, except the roof, as I was installing a bigger stereo with sub, total cost $550 (probably overdone but a great result).
Couple of rainy-day simple mods were the shorter antenna and billet fuel filler, total $185.
Stereos are a personal choice, not saying mine is elite or ultimate.. just to my taste. I bought a 7" TV DVD GPS Kenwood with Polk amps, splits, coax and sub.
Exhaust was replace and headers installed. Total $950
I finished the look with a rear diffuser and some added chrome trim. Total $440
I bought and installed flappy paddles $250, a leather steering wheel ($50 new, but the find of the century), audio controls $100, PLX OBD gauge and CF holder $320 and full leather seat retrims $595 (cheap if you install yourself).
Some other mods along the way; LED Taillights $420, reversing tv camera $35, lightened crank pulley $165, lots of Ultimate Racing bars for anti twist/sway. Whiteline XZ series sway bars, (excellent mod, bit tricky to fit front) $440.
I also have braided brake lines, some CF film decals in the interior, iPhone charging holder/transfer cable to my stereo, 500Gb HDD for stereo, chrome fog rings, bigger catalytic converter and mid-pipe (only thing to be manufactured for me, which I did not fit), a stage 1 RPW tune, some uprated bulbs etc..
One of the most satisfying things is that all but one of the mods were done without any assistance from mechanics or others. This has kept the costs low and the amount of mods that I was able to do high.... if you cannot do them yourself, then don't, but there are very talented members on this site who might be able to assist.
I think having a base model is not the end of the world!