BOOT INSTALL!!! [HELP]

nzau

New Member
Hey peoples,

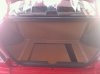
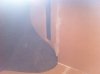
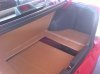
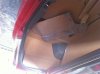
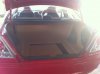
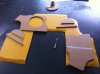
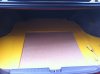
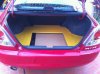
Just doing the MDF on my boot install. I've got the back panel, fake floor, floor panel, and the bits that the boot spring things have to go through. It's looking mean as...so far, until I hit this wee snag. I've gone through a heap of MDF trying to make side panels to cover up those god damn square depressions. Preferably I would like the new side panel to follow the top of the quarter panel/rear fender inside of the boot until it hits my backboard (MDF one). After a couple of hours trying to use brute force to smash it in to place I got tired and gave up so I came here to ask if anyone has dimensions and possibly a good picture of how to make these side panels. I'll upload some pictures in the morning when it is light out.

Thanksssss....Ben
 
Some pics will help heaps, but one method is to use a peice of carboard to cut and get the shape of the area and then trace it onto the mdf once its right
 
hey mate, what were you after in the mini chat??

just pm me if you like
 
God im silly I have so much cardboard lyring around aswell, jsut hope I don't need to buy anymore MDF :S. Too expensive for my taste. Pictures will be up as my next post.

@MOR31 Dude this whole topic was aimed at you lol
 
I think i'll use ye olde cardboard box for it:)
 

Attachments

  • IMG_0048.JPG
    IMG_0048.JPG
    23 KB · Views: 874
  • IMG_0046.JPG
    IMG_0046.JPG
    51.3 KB · Views: 873
  • IMG_0047.JPG
    IMG_0047.JPG
    61.3 KB · Views: 874
nzau said:
@MOR31 Dude this whole topic was aimed at you lol
hehehe, sorry i missed it, if you need any more help just pm me


lookin very gooin the pics too
 
So here is my cardboard template [Pic1] with its MDF cutout fitted :) Perfect imo. Here's one with a Sub in it [Pic2], no gasping at it being SONY please! I know they are the ass-end of audio but I have to live with what I got. I'm thinking that I'll do a progress report thing on this boot install and maybe even turn it into a tutorial for the DIY section. That's if it turns out alright...

On the topic of this whole install I've been racking my brain for a color scheme. My brother thinks high gloss black, and I think high gloss yellow with black trim. I'm going to do this wityh high gloss paint because I'm too poor for fabric or fiberglass at the moment and I fancy a airbrush:) Any ideas anyone?

P.S I will be adding perspex and neons so comment on that as well.
 

Attachments

  • IMG_0050.JPG
    IMG_0050.JPG
    38.4 KB · Views: 864
  • IMG_0051.JPG
    IMG_0051.JPG
    56.5 KB · Views: 864
black will go nice, not sure bout the yellow as the car is red. go to bunnings and get some vynel as its not to pricey
 
Bunnings sells it? Great because I went to Spotlight and they wanted 14$/m. One small q', do I 'upholster' (don't know the word) the wood pieces separately, i.e. take them all out and staple it on the reverse side, or, do I glue them on whilst they are in there?
 
progress...the blue spots are where contact glue lifted paint from my garage floor, bit of a pain but fixable, the finish is average imho
 

Attachments

  • IMG_0053.JPG
    IMG_0053.JPG
    65.7 KB · Views: 833
  • IMG_0054.JPG
    IMG_0054.JPG
    50.4 KB · Views: 834
looks kewl. kinda like my mdf floor with a trap door.

what colour neons r u going to use n where abouts r u putting em? iv got afew lights inside my boot too :)
 
Hey man I saw your progress thread, some very nice DIY going on. As for my neons, I was thinking of blue because I have some spare 28LED ones. I'll also make perspex windows for them under what will be the side paneling which you will be able to see a capacitor, or fake NOS, or something decorative like wiring (neat). I was going to go with purple neons because yellow+purple looks nice and so does red+purple, but as I said I have blue ones lying around. I'll make the windows on Wednesday and put pictures up. As for those blue stains and ugly staples I got rid of them and got a much better finish:)
 

Attachments

  • IMG_0060.JPG
    IMG_0060.JPG
    91.3 KB · Views: 818
Looks like you've got the same drama i had when I first used vinyl on my install years ago, if you get cheap stuff, the contact glue makes it crinkle and warp. To get a good finish you need to use proper auto upholstery stuff, which you'll get from an upholsterer.

Are you doing the subs at the back or in the side wheel well bits? And are you using fibreglass or all MDF?
 
All mdf. It's proper vinyl btw:) the creases are from where I had to renewal the mdf to get a snug fit. I was thinking that once all the panels are in I'll use a second coat of vinyl on the floor to hide the creases, your opinion?
 
nzau said:
All mdf. It's proper vinyl btw:) the creases are from where I had to renewal the mdf to get a snug fit. I was thinking that once all the panels are in I'll use a second coat of vinyl on the floor to hide the creases, your opinion?

Thats not gonna help... it will make it worse. You need to staple the back and use upholstery glue like stated before... But the only problem is, the glue is sold in 10L Drums.

But I would visit local trimmers and see what you can find. Best result is through an air compressor and gun, to spread evenly across the MDF.
 
It's stapled on the back and using upholstery glue. The creases are from separate pieces of wood. As we all know the CE has a tiny boot and I could not put the floor in as one piece. once the side panels are in the side creases will be covered. Once the back panel is in so will the back crease. I don't really need to add the next layer but i think it would help. Even with the creases it looks fine, will put more pics up when I go to buy perspex for windows.
 
nzau said:
12SHW, Do you have a turbo? Because of the intercooler in you sig?
:lol: :lol: :lol: :lol: :lol: :lol: :lol:


have a look in his thread
 
Back
Top