**Before getting started, please note that this was done with the brakes already upgraded to 276mm. If you have standard brakes you will need to factor in swapping the brakes as well. Also please note, I do not have any air tools, which would have changed the way I did a few things with the swap.
Parts you will need:
FTO wheel hub/knuckles
5 stud 276mm rotors
FTO/Magna/Evo calipers
Tools Used:
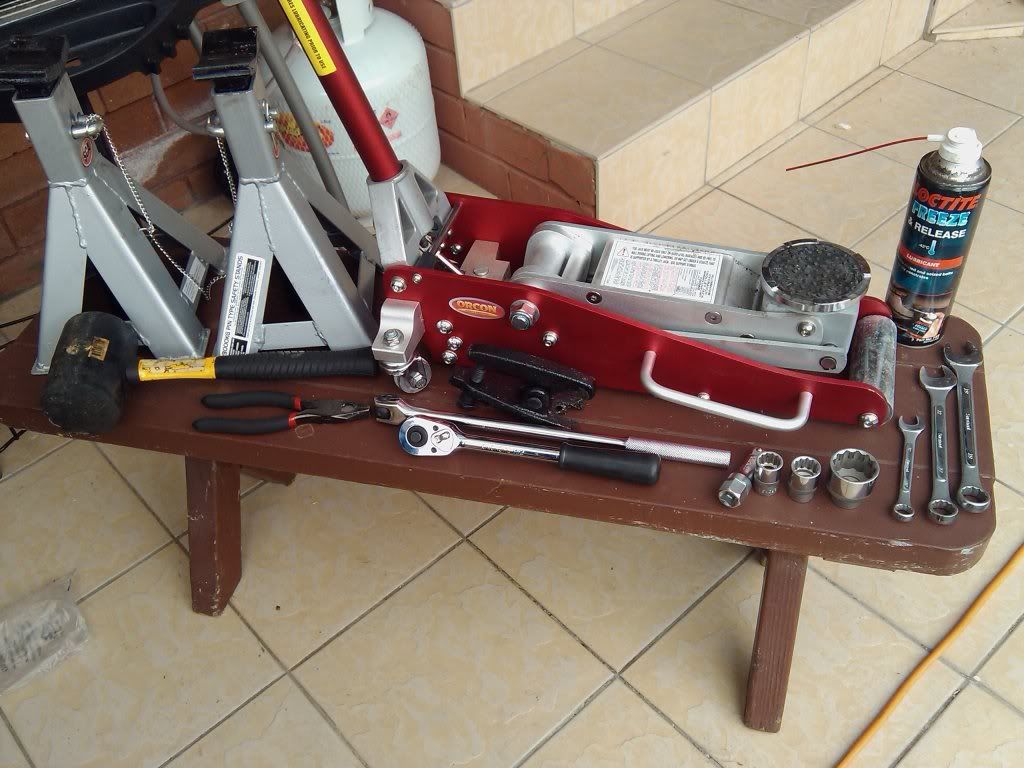
*Trolley Jack
*Jack Stands
*Rubber mallet (for persuading those tough bolts)
*Freeze and Release
*Pliers
*Ball Joint Puller/Separator
*Ratchet
*32mm, 19mm, 17mm sockets
*Socket extension piece
*19mm, 17mm, 12mm spanners
*Breaker Bar
The Doing
1. Crack the CV nut. Remove the split pin, and use the 32mm socket and breaker bar to crack it. I tried this a few ways and found the best way was to do this before jacking the car up. That way the hub will not spin at all when cracking the nut.
2. Once you have loosened the CV nut, jack the car up, put the jack stands in place and remove the wheel. Won't go into detail here, I assume everyone attempting this knows how to do this lol.
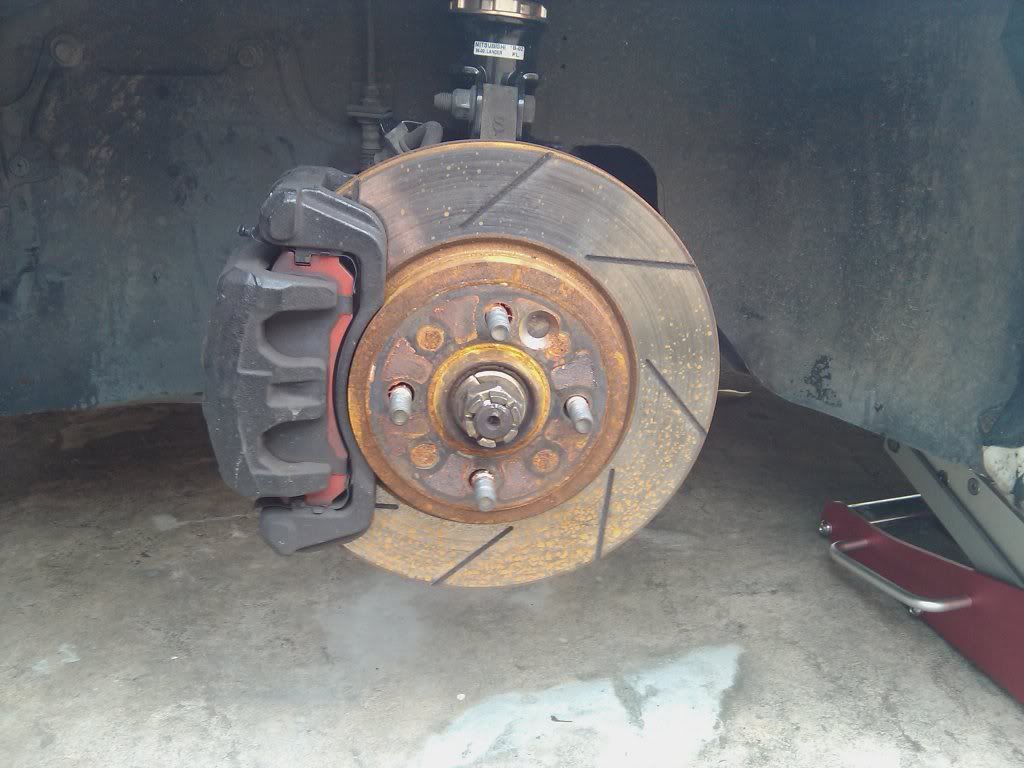
3. Remove the caliper. Remove the brake line clip, and then remove the two bolts holding the caliper in place (I think these are 19mm?). There should be plenty of line that you can sit the caliper on the ground while you do this to keep it out of the way without undoing the line and getting brake fluid everywhere. Then remove the rotor
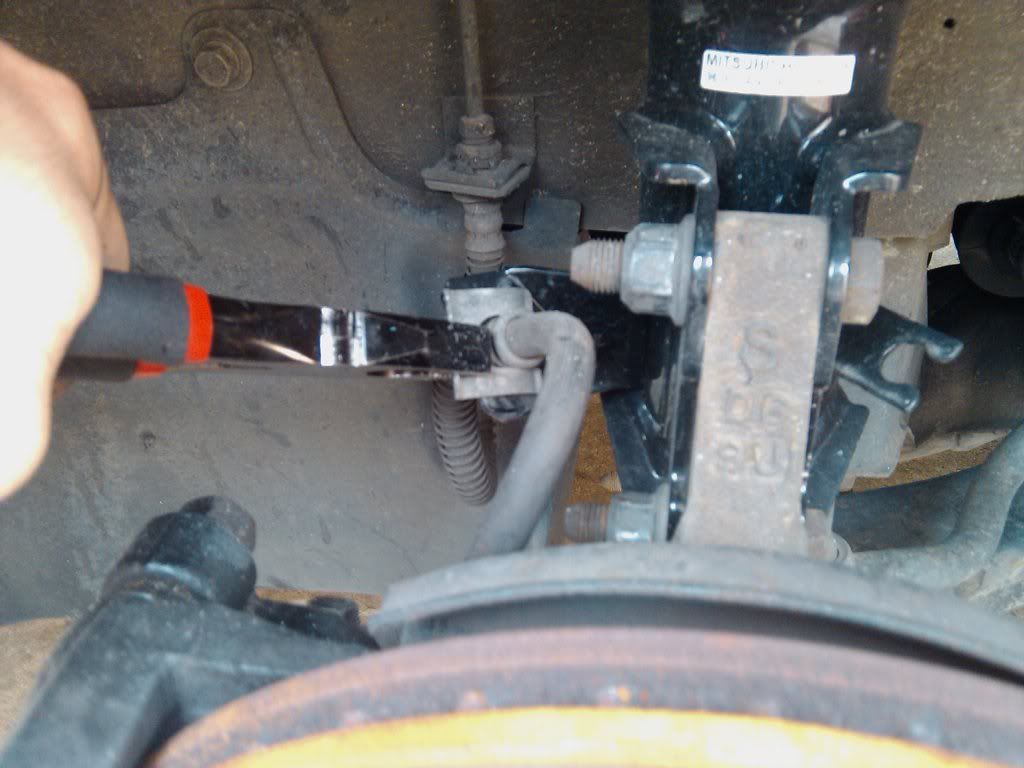
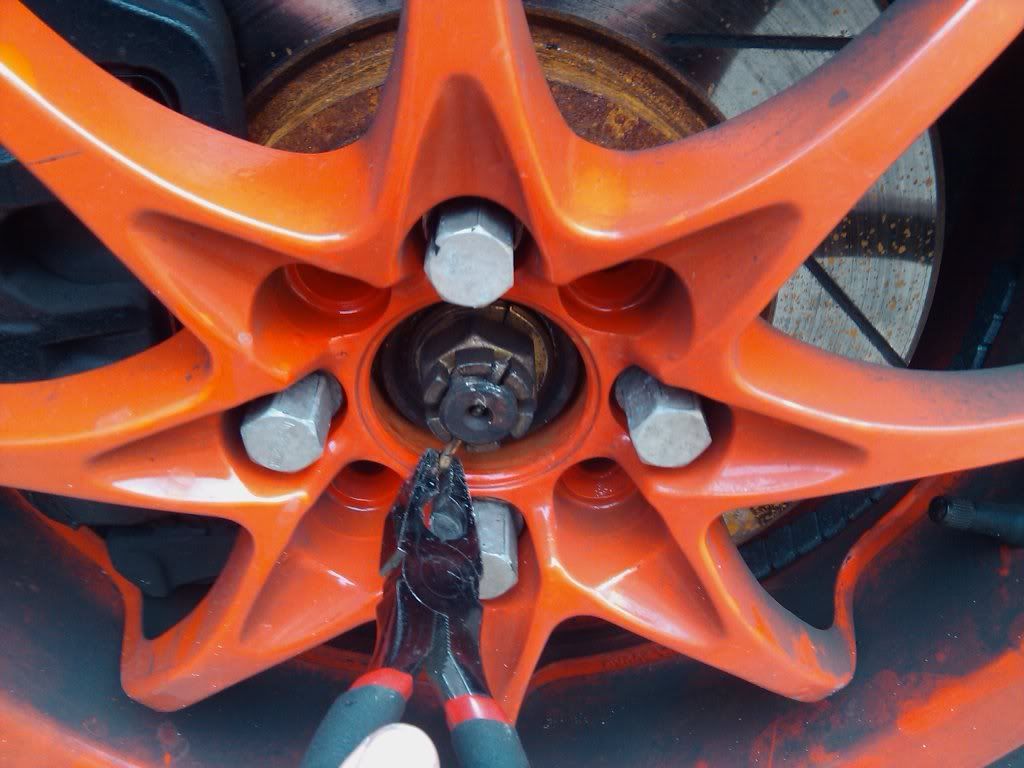
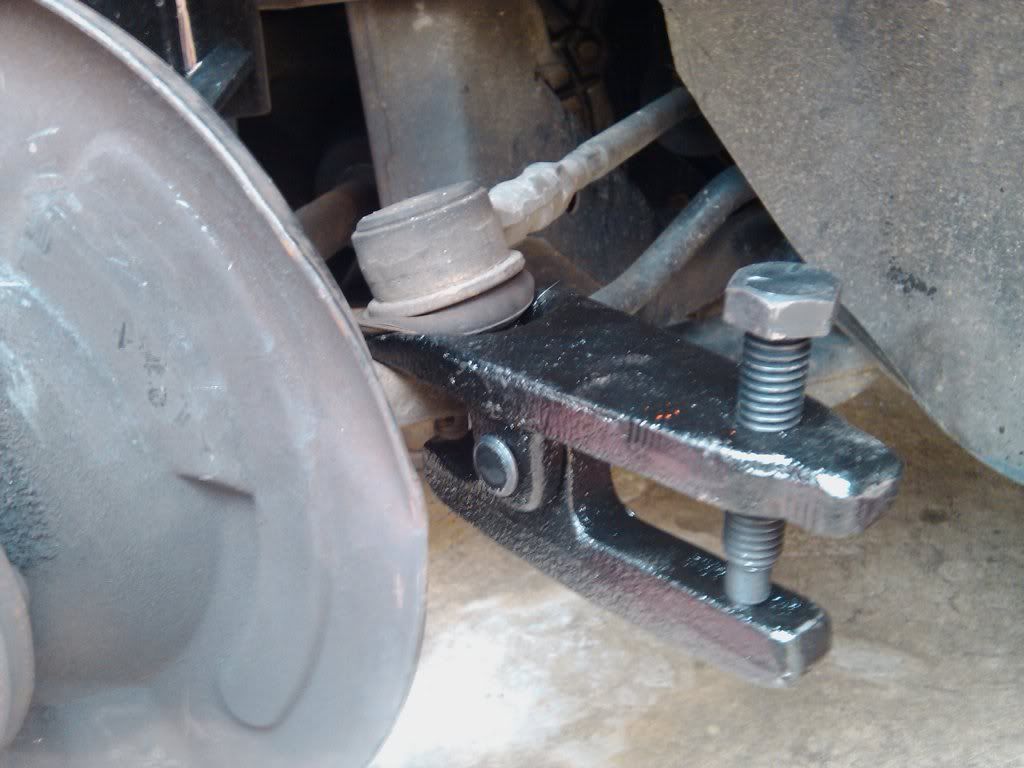
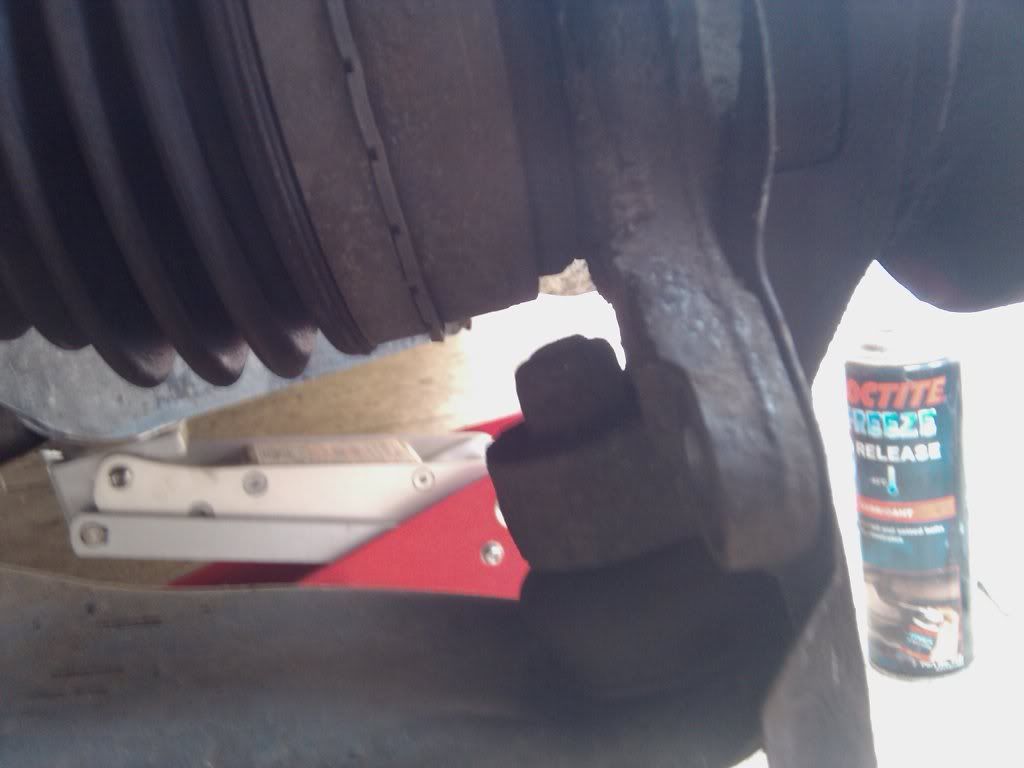
4. Pop the tie rod end. Remove the split pin, and undo the 17mm nut at the bottom of the joint. Put the Ball Joint puller in place and tighten to pop the tie rod end out.
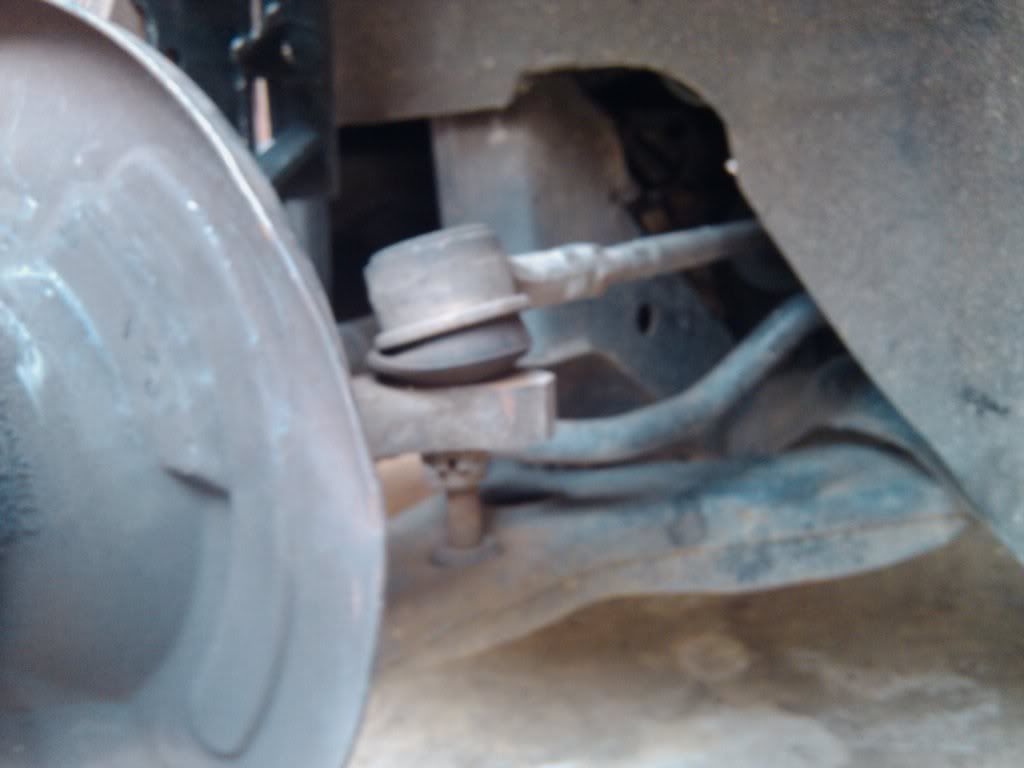
5. Remove the CV shaft. Loosen the 19mm nut holding the Lower Control arm to the hub/knuckle setup. Then undo the two bolts holding the knuckles into the strut. Next push the shaft out ( :lol: ) - will take a bit of swivelling around. This is the nut under the drive shaft that needs to be removed to allow separating the knuckle from the LCA:
6. Pop the LCA. Use the Ball Joint Puller again on the LCA -> knuckle ball joint. Once this is popped you can now remove the old hub and knuckles
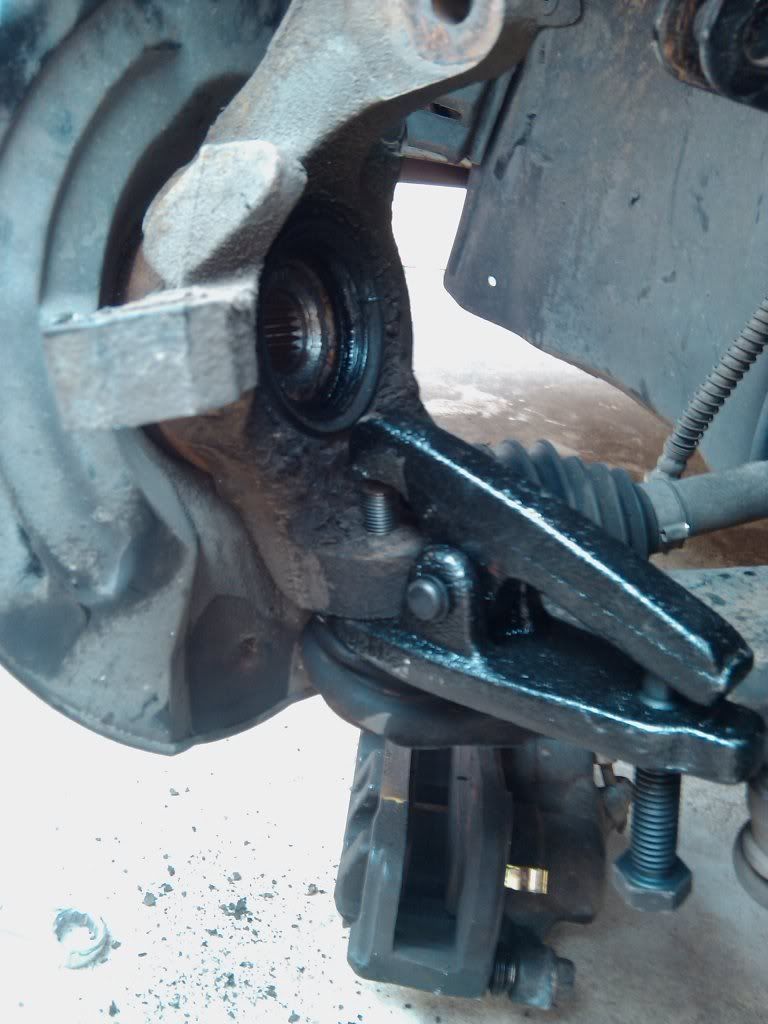
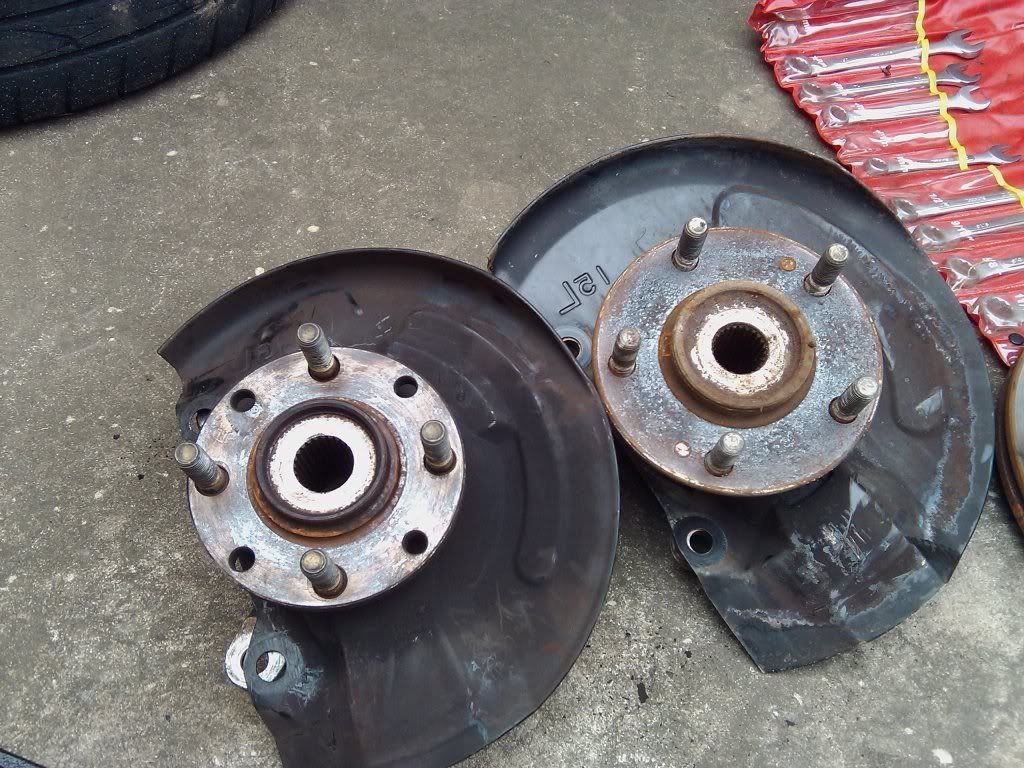
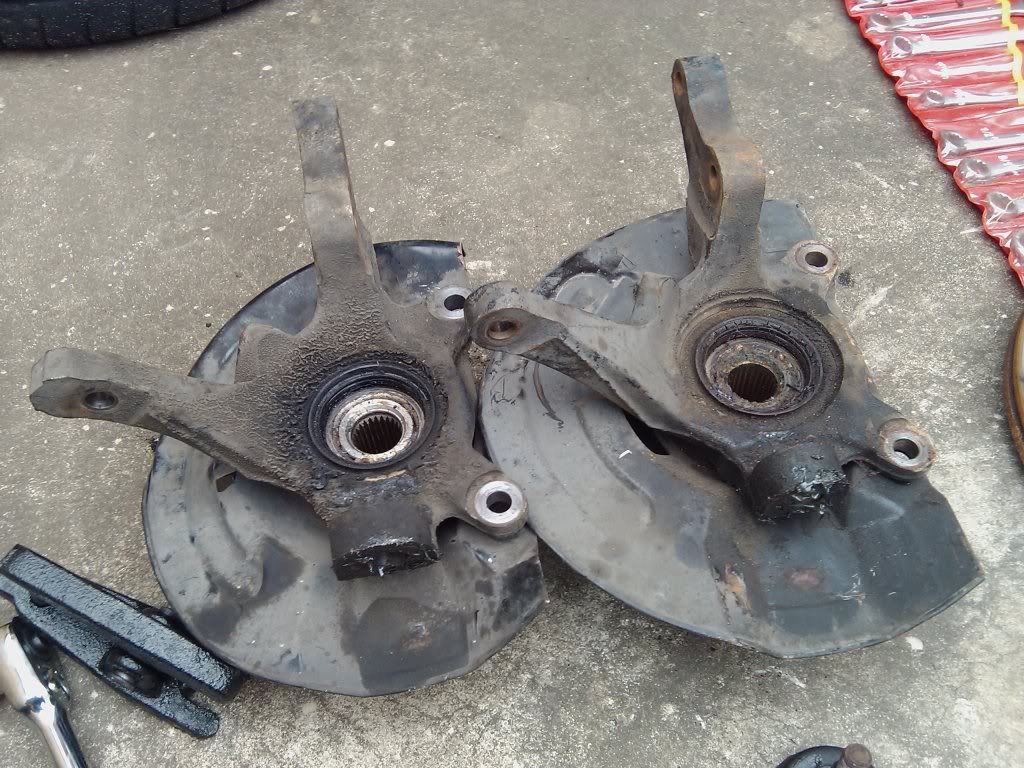
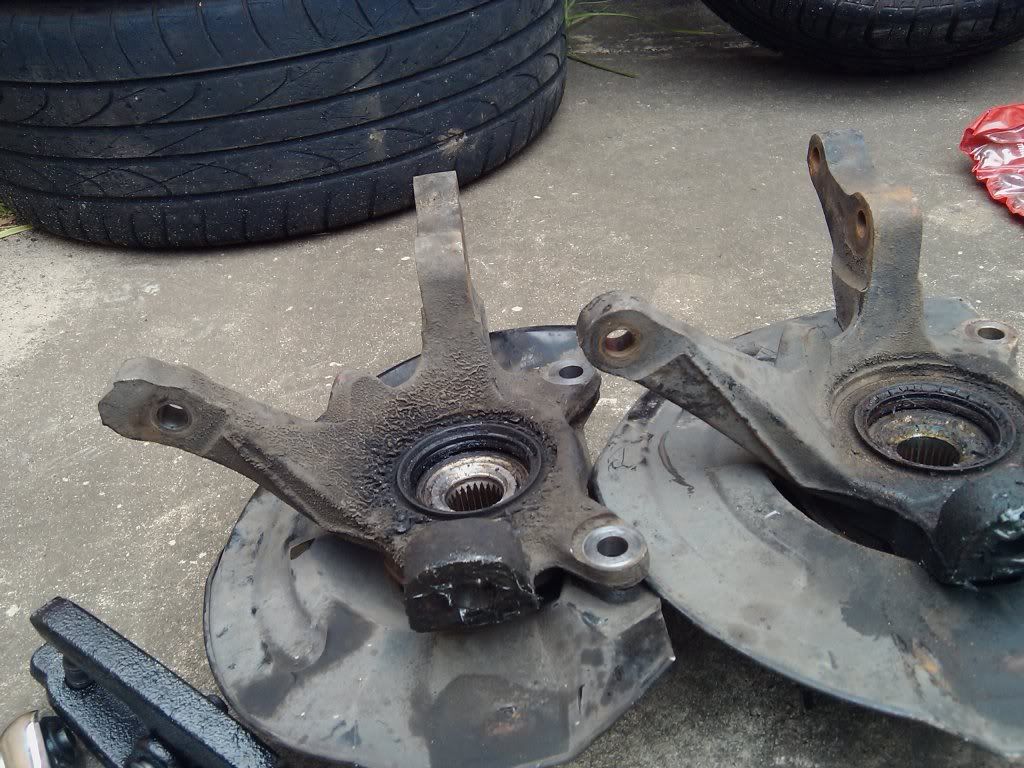
Now they are removed you can see that the knuckle setup aligns almost identically to the standard mirage/lancer setup. You can notice here that the mount hole for the tie rod end sits slightly off between the two. This causes the toe to be thrown out, and will need to be adjusted later on.
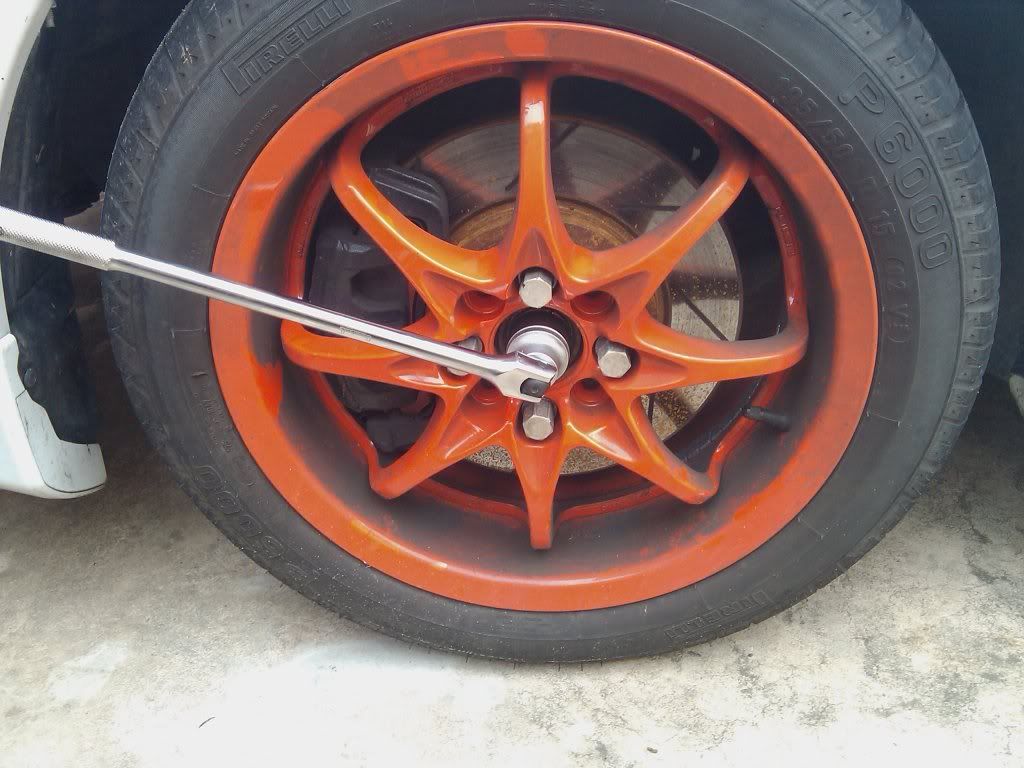
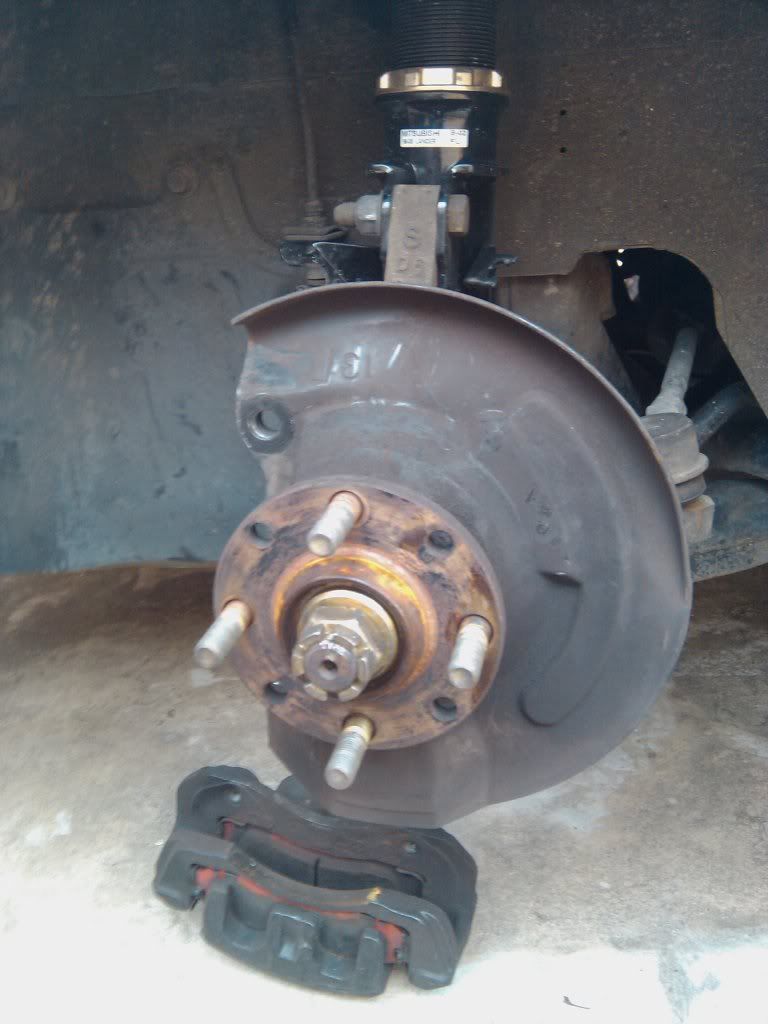
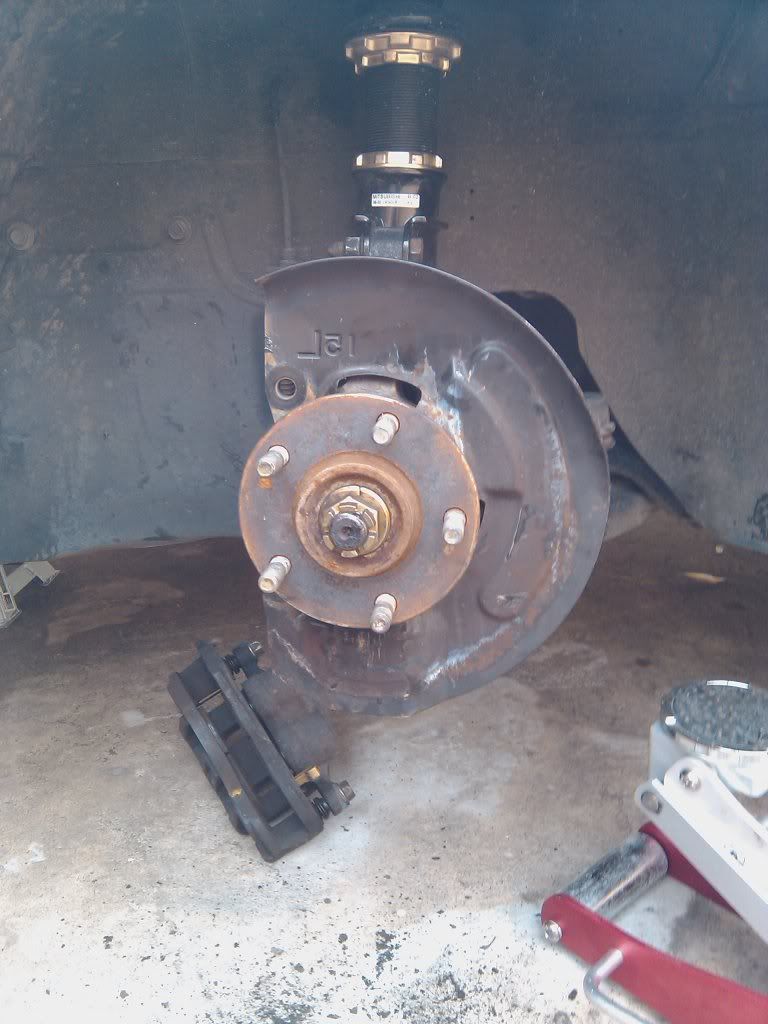
7. Now put the FTO knuckle/hub setup into and bolt everything back in, in the reverse of the way you removed it. The nut under the CV shaft is the first one to get tightened, because you cannot put it in once the CV shaft is back in place. It does not have to be tightened completely at this stage, it is probably a good idea not to tighten it all the way so that you have some movement in it for getting the CV in place. It should now look like this:
8. Use the new 5 stud rotor, and bolt the caliper back into place. Now that it is all back into place, you will notice that there is significant toe-in. To counter that, adjust the tie rod end by using the 17mm and 12mm spanners. First crack the 17mm nut and spin it all the way in, and then tighten the shafts back the other way with the 12mm spanner. Adjust it so that it looks as close to straight as possible. A wheel alignment will help get this spot on.
9. Make sure everything is tight, replace the wheel and then do the final tightening of the CV nut.
10. Stand back and admire your handywork.
Hope this helps a few people. I will post up the rear swap when I do that
*Please note that this is just the way I did the swap. It may or may not be the correct way to go about things as I am not a mechanic, and I do not take any responsibility for any damage you may cause through doing this.
Parts you will need:
FTO wheel hub/knuckles
5 stud 276mm rotors
FTO/Magna/Evo calipers
Tools Used:
*Trolley Jack
*Jack Stands
*Rubber mallet (for persuading those tough bolts)
*Freeze and Release
*Pliers
*Ball Joint Puller/Separator
*Ratchet
*32mm, 19mm, 17mm sockets
*Socket extension piece
*19mm, 17mm, 12mm spanners
*Breaker Bar
The Doing
1. Crack the CV nut. Remove the split pin, and use the 32mm socket and breaker bar to crack it. I tried this a few ways and found the best way was to do this before jacking the car up. That way the hub will not spin at all when cracking the nut.
2. Once you have loosened the CV nut, jack the car up, put the jack stands in place and remove the wheel. Won't go into detail here, I assume everyone attempting this knows how to do this lol.
3. Remove the caliper. Remove the brake line clip, and then remove the two bolts holding the caliper in place (I think these are 19mm?). There should be plenty of line that you can sit the caliper on the ground while you do this to keep it out of the way without undoing the line and getting brake fluid everywhere. Then remove the rotor
4. Pop the tie rod end. Remove the split pin, and undo the 17mm nut at the bottom of the joint. Put the Ball Joint puller in place and tighten to pop the tie rod end out.
5. Remove the CV shaft. Loosen the 19mm nut holding the Lower Control arm to the hub/knuckle setup. Then undo the two bolts holding the knuckles into the strut. Next push the shaft out ( :lol: ) - will take a bit of swivelling around. This is the nut under the drive shaft that needs to be removed to allow separating the knuckle from the LCA:
6. Pop the LCA. Use the Ball Joint Puller again on the LCA -> knuckle ball joint. Once this is popped you can now remove the old hub and knuckles
Now they are removed you can see that the knuckle setup aligns almost identically to the standard mirage/lancer setup. You can notice here that the mount hole for the tie rod end sits slightly off between the two. This causes the toe to be thrown out, and will need to be adjusted later on.
7. Now put the FTO knuckle/hub setup into and bolt everything back in, in the reverse of the way you removed it. The nut under the CV shaft is the first one to get tightened, because you cannot put it in once the CV shaft is back in place. It does not have to be tightened completely at this stage, it is probably a good idea not to tighten it all the way so that you have some movement in it for getting the CV in place. It should now look like this:
8. Use the new 5 stud rotor, and bolt the caliper back into place. Now that it is all back into place, you will notice that there is significant toe-in. To counter that, adjust the tie rod end by using the 17mm and 12mm spanners. First crack the 17mm nut and spin it all the way in, and then tighten the shafts back the other way with the 12mm spanner. Adjust it so that it looks as close to straight as possible. A wheel alignment will help get this spot on.
9. Make sure everything is tight, replace the wheel and then do the final tightening of the CV nut.
10. Stand back and admire your handywork.
Hope this helps a few people. I will post up the rear swap when I do that
*Please note that this is just the way I did the swap. It may or may not be the correct way to go about things as I am not a mechanic, and I do not take any responsibility for any damage you may cause through doing this.
") good diy man, john and i could have used a ball joint puller the other day :lol:
good diy man, john and i could have used a ball joint puller the other day :lol: