This is assuming the doors are off the car. If the doors are still attached, either give the car power so you can adjust the windows up/down when needed, or detach the door looms at the doors and manipulate them via a 12v power source and some wire.
Pictures are labelled for reference
Parts you need:
4x door cards
4x window switches
4x door looms
4x window regulators/motors
2x front door card brackets (take these from donor doors)
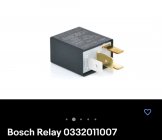
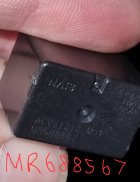
1x MR588567 relay
Possibly an assortment of 7.5, 10, 15 and 20 amp fuses.
Tools:
Phillips and flathead screwdrivers
10mm socket + ratchet
12v power source
2x small wires (for manipulating windows up/down to access regulator/window bolts)
Pliers (for annoying clips)
Method:
Your first goal is undoing every trim screw/bolt so you can remove the door card. There is a small tab in both the door handle and door pocket next to the window switches. Pry these up with a thin flathead to reveal a screw. Undo these. There are two small trim screws at each side of the door card. Pop these open with the screwdriver, take them out. The trim around the door handle needs to be pulled out (firm, but not stupidly hard) and around the door handle.
Then feel around the bottom of the door trim for whichever side feels more loose and you can get some leverage under. Pull away from the door and the door card with pop off at the bottom (don't yank on the lower door pocket, yank on the actual card itself at the bottom corners). Pop the card out around the sides, and when only the top is still attached, lift the whole card up and away from the door to pull it off completely. The window switches will still be plugged in, unplug those, set the door card aside.
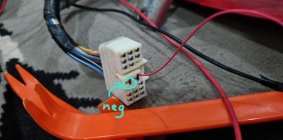
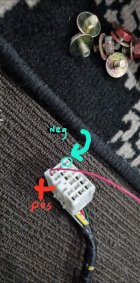
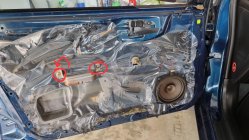
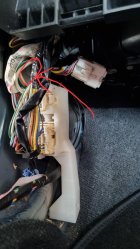
Second goal, disassembling the inner workings of the door. I am using the drivers door as reference here. Start by removing any speakers, and the fat metal plate in the middle of the door. Pull the plastic sheet off the door and watch out for goo. You can decide whether you reuse these or not, but they will require replacement glue. Keep the rest of the loom plugged in, except at the door (assuming you are not using the cars battery itself to move the windows up/down). At the door loom, put the pos and neg wires into the pins as shown, this will enable the master window switch to work. For passenger front door, use the other two pins as shown. Note that when you make this circuit in the passenger door, it lowers the window automatically and sparks a bit. Just keep the connection active as long as you need until the window is down to where you can access both bolts (window about 80% down).
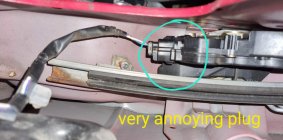
Third goal, removing the regulator and door looms. With the window down about 80%, you should have access to the two bolts holding the glass to the regulator. Remove these and the window will become loose. You can remove this glass by carefully pulling it up and out of the window. At this point, you can unplug and detach the whole loom. Theres many little plastic plugs holding the loom in the door. Either break them all or remove gently to re-use the plugs. Where the door loom meets the dash loom, push this into the door by pushing in one of the corners. It will feel immovable, but only has to move like 2mm until it falls inside the door. Feed the rest of the loom into the door and make sue it's unplugged from every clip, and pull the whole loom out. There are 3 bolts holding in the motor, and 4 bolts holding the regulator - two top and 2 bottom. Remove those, plus a small grey plastic clip to free the regulator, and slide it out of the door. Note if you are struggling to remove the loom where it meets the door (opposite side of where it goes to the dash loom) there are 3 screws on the side of the door which loosen up the hinge mechanism. This allows you to wiggle it around more and unclip that last annoying plug.
The rear doors do not require a power source. You can access the bolts attached to the windows when they are fully up. The rear doors also have an exceptionally annoying plug holding the loom into the door, have fun with that.
Congrats, you have everything you need from one door. Now do that 3 more times, and reverse the install into your own car. Everything is plug and play, assuming you have the dash loom that supports power windows already.
Installing power windows
So you should have all the parts ready to go, time to put them in your car. These steps will be the same for all door cards. When there is a difference, the step will indicate where.
Step One (removing manual door cards)
Remove the door card from the door. You'll need to remove the winders, a YouTube tutorial will be helpful here. Basically shove a screwdriver between the plastic circle of the handle and the handle itself. Pry a smaller screwdriver inside this gap and use it to pry off the little circular metal clip you should be able to see. Once dislodged, the winder will slide off. Remove the metal brackets where the door pocket bolts to (remember these little white plastic screw holes for later), remove the speakers, peel the plastic sheet off so you can access the internals of the door. Up to you whether you clean the goo off the doors and reseal, or be careful enough to reuse the plastic and original goo.
Step Two (removing door guts)
Wind the windows manually to where they need to be to access the bolt holes (make this as low as possible). Remove the window glass, obviously the rear windows are far more annoying. You could leave the glass in the door by taping it if you wanna take that chance. Also gives you less room to work with inside the door, but you do you. Unplug the loom, unbolt the manual winder motor, jimmy it all out of the door. Replace the manual window regulator with the power one.
Step Three (interior loom plugs)
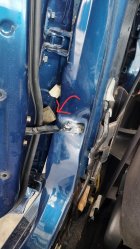
Replace the door loom. The rear looms plug in at the pillar, literally basically where the pillar itself is. You'll need some small hand wizardry and patience to get it unplugged. The front driver loom plugs in near the drivers right foot. The front passenger side plugs in at the same area but on the passenger side. You'll need to remove the kick panel and the scuff plate on each side for each front door to access these. Pull on the loom in the door and feel different areas of the interior loom to find which plug you're looking for (they are higher up). When replacing looms with the power window looms, plugging them back in to the interior loom is the last step before reassembling the door. Priority should be given to getting the looms themselves through the holes in the doors.
Step Four (reassembly differences)
When replacing all the door internals, first check that the regulators actually work. Either use your 12v power source to test this, or look at the next step for info about the relay to get them working so you can test from the master switch. The door pocket brackets from the rears are the same, the front are different. You need the brackets from the donor doors, you can throw your manual ones away. They also screw in in different locations. Note those two white plastic screw holes from earlier, one of those need to be moved over so the bracket holes line up. Your door skin has this square cut-out already in place, you just need to squeeze in the back of the white clip, pop it out, move it into the square hole next to it. The rest of the door assembly is as before, no differences here except for feeding the window switch plug through the door card as you put it back on.
Step Five (adding the relay)
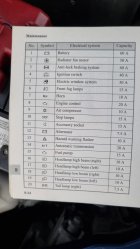
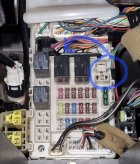
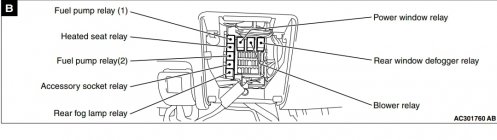
At this point you should have the doors reassembled 100%. Now look at the dash, drivers side. There's a little pocket you can pull out under the steering wheel ,near the bonnet release. Pull that pocket out, squeeze the back hinges of it and remove it completely. This will reveal the interior fuse box. You will see at the top of this box, that you probably only have 2 big fat relays plugged in. See the picture for clarification. You need the left-most of those 3 to have a relay, this is the key to getting your power windows working. Use the right-most relay if you don't have a spare ready to plug in - buy a relay and replace the one you stole later (OEM Bosch replacement in pictures). If you still have no power, check the fuses under the dash and engine bay, and make sure you have the correct amp fuse in each location - and that you have a power windows fuse. Check the underside of the lid for both the interior and engine fuse box for which fuse is which (you want a symbol of a window with an up/down arrow on it).
Step Six
Key in the ignition, turn it two clicks so everything is powered and you should see the light on the master switch turn on. If not, no big deal, but test the windows and see that all 4 go up/down all the way and don't get stuck, scratched etc. Congrats, you have entered the 21st century, and it only took you a full day and lots of swearing at looms and plastic.
Cheats:
Steal the door rubber and the black strip at the top of the door metal (bottom of the window) because these are perishables which are probably ratty/faded/peeled back to chrome on your own car.
Black strip is a combination or undo 1 small screw, and yank/peel back. It clips into the door metal itself. It's a real pain to get off.
Pictures are labelled for reference
Parts you need:
4x door cards
4x window switches
4x door looms
4x window regulators/motors
2x front door card brackets (take these from donor doors)
1x MR588567 relay
Possibly an assortment of 7.5, 10, 15 and 20 amp fuses.
Tools:
Phillips and flathead screwdrivers
10mm socket + ratchet
12v power source
2x small wires (for manipulating windows up/down to access regulator/window bolts)
Pliers (for annoying clips)
Method:
Your first goal is undoing every trim screw/bolt so you can remove the door card. There is a small tab in both the door handle and door pocket next to the window switches. Pry these up with a thin flathead to reveal a screw. Undo these. There are two small trim screws at each side of the door card. Pop these open with the screwdriver, take them out. The trim around the door handle needs to be pulled out (firm, but not stupidly hard) and around the door handle.
Then feel around the bottom of the door trim for whichever side feels more loose and you can get some leverage under. Pull away from the door and the door card with pop off at the bottom (don't yank on the lower door pocket, yank on the actual card itself at the bottom corners). Pop the card out around the sides, and when only the top is still attached, lift the whole card up and away from the door to pull it off completely. The window switches will still be plugged in, unplug those, set the door card aside.
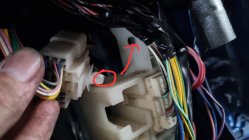
Second goal, disassembling the inner workings of the door. I am using the drivers door as reference here. Start by removing any speakers, and the fat metal plate in the middle of the door. Pull the plastic sheet off the door and watch out for goo. You can decide whether you reuse these or not, but they will require replacement glue. Keep the rest of the loom plugged in, except at the door (assuming you are not using the cars battery itself to move the windows up/down). At the door loom, put the pos and neg wires into the pins as shown, this will enable the master window switch to work. For passenger front door, use the other two pins as shown. Note that when you make this circuit in the passenger door, it lowers the window automatically and sparks a bit. Just keep the connection active as long as you need until the window is down to where you can access both bolts (window about 80% down).
Third goal, removing the regulator and door looms. With the window down about 80%, you should have access to the two bolts holding the glass to the regulator. Remove these and the window will become loose. You can remove this glass by carefully pulling it up and out of the window. At this point, you can unplug and detach the whole loom. Theres many little plastic plugs holding the loom in the door. Either break them all or remove gently to re-use the plugs. Where the door loom meets the dash loom, push this into the door by pushing in one of the corners. It will feel immovable, but only has to move like 2mm until it falls inside the door. Feed the rest of the loom into the door and make sue it's unplugged from every clip, and pull the whole loom out. There are 3 bolts holding in the motor, and 4 bolts holding the regulator - two top and 2 bottom. Remove those, plus a small grey plastic clip to free the regulator, and slide it out of the door. Note if you are struggling to remove the loom where it meets the door (opposite side of where it goes to the dash loom) there are 3 screws on the side of the door which loosen up the hinge mechanism. This allows you to wiggle it around more and unclip that last annoying plug.
The rear doors do not require a power source. You can access the bolts attached to the windows when they are fully up. The rear doors also have an exceptionally annoying plug holding the loom into the door, have fun with that.
Congrats, you have everything you need from one door. Now do that 3 more times, and reverse the install into your own car. Everything is plug and play, assuming you have the dash loom that supports power windows already.
Installing power windows
So you should have all the parts ready to go, time to put them in your car. These steps will be the same for all door cards. When there is a difference, the step will indicate where.
Step One (removing manual door cards)
Remove the door card from the door. You'll need to remove the winders, a YouTube tutorial will be helpful here. Basically shove a screwdriver between the plastic circle of the handle and the handle itself. Pry a smaller screwdriver inside this gap and use it to pry off the little circular metal clip you should be able to see. Once dislodged, the winder will slide off. Remove the metal brackets where the door pocket bolts to (remember these little white plastic screw holes for later), remove the speakers, peel the plastic sheet off so you can access the internals of the door. Up to you whether you clean the goo off the doors and reseal, or be careful enough to reuse the plastic and original goo.
Step Two (removing door guts)
Wind the windows manually to where they need to be to access the bolt holes (make this as low as possible). Remove the window glass, obviously the rear windows are far more annoying. You could leave the glass in the door by taping it if you wanna take that chance. Also gives you less room to work with inside the door, but you do you. Unplug the loom, unbolt the manual winder motor, jimmy it all out of the door. Replace the manual window regulator with the power one.
Step Three (interior loom plugs)
Replace the door loom. The rear looms plug in at the pillar, literally basically where the pillar itself is. You'll need some small hand wizardry and patience to get it unplugged. The front driver loom plugs in near the drivers right foot. The front passenger side plugs in at the same area but on the passenger side. You'll need to remove the kick panel and the scuff plate on each side for each front door to access these. Pull on the loom in the door and feel different areas of the interior loom to find which plug you're looking for (they are higher up). When replacing looms with the power window looms, plugging them back in to the interior loom is the last step before reassembling the door. Priority should be given to getting the looms themselves through the holes in the doors.
Step Four (reassembly differences)
When replacing all the door internals, first check that the regulators actually work. Either use your 12v power source to test this, or look at the next step for info about the relay to get them working so you can test from the master switch. The door pocket brackets from the rears are the same, the front are different. You need the brackets from the donor doors, you can throw your manual ones away. They also screw in in different locations. Note those two white plastic screw holes from earlier, one of those need to be moved over so the bracket holes line up. Your door skin has this square cut-out already in place, you just need to squeeze in the back of the white clip, pop it out, move it into the square hole next to it. The rest of the door assembly is as before, no differences here except for feeding the window switch plug through the door card as you put it back on.
Step Five (adding the relay)
At this point you should have the doors reassembled 100%. Now look at the dash, drivers side. There's a little pocket you can pull out under the steering wheel ,near the bonnet release. Pull that pocket out, squeeze the back hinges of it and remove it completely. This will reveal the interior fuse box. You will see at the top of this box, that you probably only have 2 big fat relays plugged in. See the picture for clarification. You need the left-most of those 3 to have a relay, this is the key to getting your power windows working. Use the right-most relay if you don't have a spare ready to plug in - buy a relay and replace the one you stole later (OEM Bosch replacement in pictures). If you still have no power, check the fuses under the dash and engine bay, and make sure you have the correct amp fuse in each location - and that you have a power windows fuse. Check the underside of the lid for both the interior and engine fuse box for which fuse is which (you want a symbol of a window with an up/down arrow on it).
Step Six
Key in the ignition, turn it two clicks so everything is powered and you should see the light on the master switch turn on. If not, no big deal, but test the windows and see that all 4 go up/down all the way and don't get stuck, scratched etc. Congrats, you have entered the 21st century, and it only took you a full day and lots of swearing at looms and plastic.
Cheats:
Steal the door rubber and the black strip at the top of the door metal (bottom of the window) because these are perishables which are probably ratty/faded/peeled back to chrome on your own car.
Black strip is a combination or undo 1 small screw, and yank/peel back. It clips into the door metal itself. It's a real pain to get off.
Attachments
-
 Bosch replacement.jpg119.4 KB · Views: 4
 -
 Fuse list.jpg270 KB · Views: 5
 -
 Drivers side plug.jpg147.2 KB · Views: 5
 -
 Door card removed.jpg332.9 KB · Views: 6
 -
 Fuses.jpg490.1 KB · Views: 5
 -
 Interior fuse box.jpg723.8 KB · Views: 5
 -
 Passenger loom plug.jpg239.8 KB · Views: 5
 -
 Rear door plugs.jpg616.1 KB · Views: 4
 -
 Relay Guide.jpg109.6 KB · Views: 4
 -
 Relay part number.jpg155.4 KB · Views: 4
Last edited: