DIY: R-swaybar install

Just letting people know that I tried putting it on last night but ran into trouble due to the way the exhaust was attached. Where the swaybar bracket was meant to go is where the exhaust place welded the joints holding the pipe steady, hence I will need to get my exhaust brackets re-welded to fit the swaybar.

Im running a 2" catback with a lukey ultraflow as suggested by RPW, hence could be a common problem if any of you plan to get the same exhaust done.
 
Reference images:
Though these are for the mirage, they should be very very similar to the lancer:

dsc01872xb.jpg

For the above image, the rightangle metal elbow is meant to be turned the opposite direction.

dsc01871me.jpg

For the above image, the swaybar attaches to the top of the link, on the right hand side, and comes out (toward you/"towards out of the photo")
 
Res, you have put the washers in the wrong places.
If you dont put the large washer on the polyurethane bushing side of the endlink it will not load the bushing up correctly.
Anthony/lilanoki has installed a kit purchase from me in the correct way.
 
red lines are where my washers are.
where am i wrong?

dsc01872xb.jpg
 
look below the big large is on the wrong side. if you have used the large washer on the wrong side then the small washer will be on the wrong side.
DSCF6800.jpg
 
ahkay so i have washers where they should be washers just not the right size
i'll swap them around next time im under

owell had no instructions for it back in the day, i think i didnt do too bad of a job without
 
Maybe Anthony has put them incorrectly too so check your installation.
 
bedroom sway bar assembly instructions
someone asked me about it so i know it will help at least a couple of people.

IMG_3077.jpg


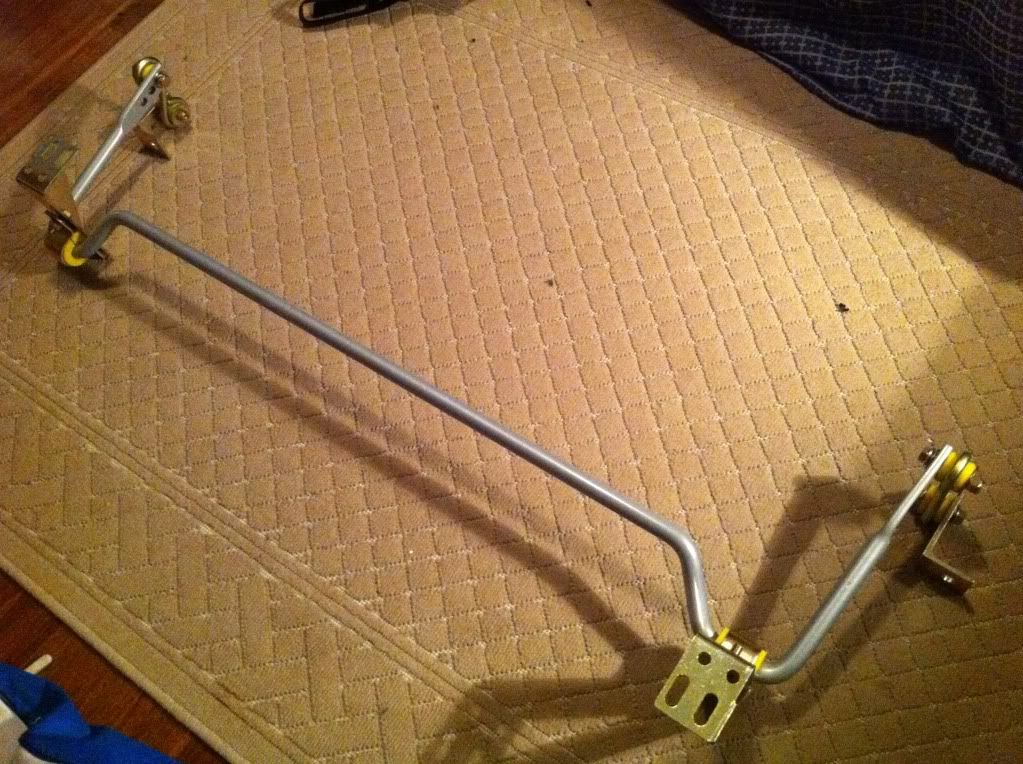
assemble the large brackets in the direction shown (brackets face in opposite directions)
Use the 4 hex bolts to bolt into chassy and the other 4 bolts to connect the U bushes and bar to the large bracket.

Now for 8 links
The longest 2 bolts will go thru the 8 links and the sway bar at the top, the 2 slightly shorter go thru the 8 links and small right angle brackets at the bottom.

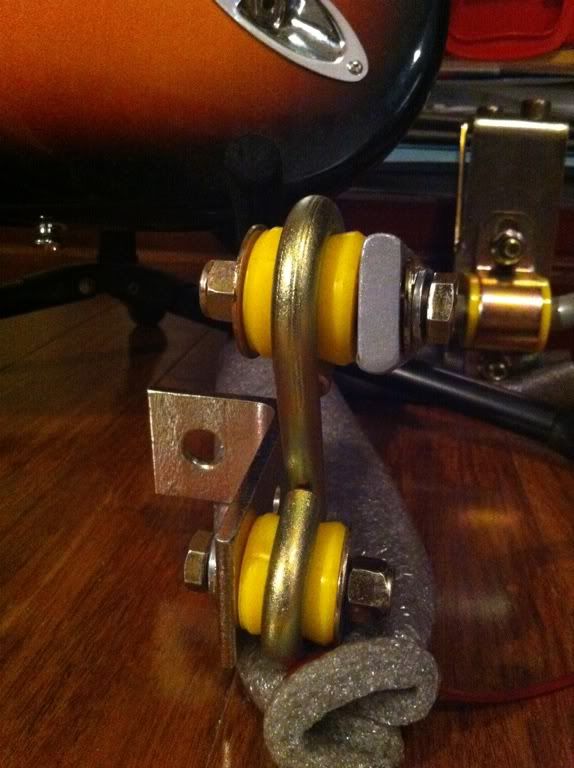
picture of closest 8link in above picture:
5ad54e0d.jpg

at the top from left to right, using the longer bolt
nut/large washer/8link/sway bar/small washer/silver washer/bolt head

at the bottom, left to right with slightly shorter bolt
bolt head/silver washer/small washer/right angle bracket/8link/large washer/nut

For the farthest side 8 links of 1st pic, the order is exactly the same just reversed, so 8 links are always on the outside of the bar.

(view 1st pic to see direction of smaller brackets. they may actually be the wrong way around as I haven't actually installed it yet, but I think that's right, just flip it around if it doesn't line up when installing)
(actually i think the farthest small bracket is backwards in the picture, should be opposite way of closest small bracket)

Also when changing stiffness settings, there are 2 holes in the small bracket and 3 in the sway bar. when changing holes on the sway bar it's important to change the hole in the small bracket so the 8 link is going straight up and down or as vertically as possible.

im pretty sure that's all right but if not, correct me please :)
 
I know this is old but I'm fairly new and looking at installing a sway bar. Does anyone have the photos? For some reason the "Photos are not found"
Thanks
 
A copy incase their website stops hosting it.

This applies to both the bmr51z and bmr54z. Lancer and mirage variants.

The only difference between both models is the mirage version has a slight different kink in the bar to avoid the muffler.
 

Attachments

  • Z320_Z164.pdf
    1.1 MB · Views: 13
Back
Top