Punktastic
New Member
hey guys thought this would be great for here does work pretty well
Though there are difference since some people have older models and what not but i did try it on my friends
old stock lights for his 2006 lancer and worked
1. Pop the hood, remove 3 bolts per headlight. These are 10mm bolts.
2. Unplug the headlight bulbs
3. Pull headlight housing out and take inside
4. Pre-heat your oven to 160-180*C
5. Clean the headlight lenses
6. Remove all bulbs, unscrew and remove the wiring mounting brackets, set in safe place
7. Get a cookie sheet, grab a medium sized towel, make it moist with water, and place it on cookie sheet
8. After removing ALL bulbs from HL, stick on cookie sheet
9. Place cookie sheet with HL on it in oven for 5-6 minutes (not much more, one HL at a time)
10. Use oven gloves to remove cookie sheet
11. Gently bend the "clips" surrounding the housing upwards (they are black little over clips, which hold in the clear plastic, you will see them).
12. Pull the clear plastic away from the back housing, I used a screw driver and CAREFULLY/slowly pried small parts away around the housing and then pulled apart
13. Repeat steps 8-12 for 2nd headlight
14. Remove the inner chrome piece from the clear part of the headlight. You will need to unscrew 2 screws with a Phillips screw driver
15. You will see a clear plastic circle thing in the housing (blinker light cover). GENTLY remove this by pushing the clip on the top down. Be CAREFULL. I broke one of mine (this IMO is the hardest part of this project)
16. Sand the chrome housing somewhat with 400grit sand paper. This helps the paint stick (OPTIONAL)
17. Find a place to paint
18. Coat the chrome housing with black primer. Spray lightly, you will spray this 3 times total with primer
19. Let sit 15 minutes
20. Re-spray with primer
21. Let sit 15 minutes
22. Re-spray with primer
23. Let sit 15 minutes
24. Spray with the color you have chosen. Most do black, I did a gunmetal metallic flake
25. Let sit 15 minutes
26. Re-spray with color
27. Let sit 15 minutes
28. Re-spray with color
29. Let the light dry for a few hours in a warm area
30. After drying, re-insert the clear plastic circle thing in the housing, this should 'pop' back into place
31. Put the painted pieces back in the clear housing, re-screw them into place.
32. Stick the back housing and the clear part back together, get it lined up as close as possible
33. Stick back in oven (on cookie sheet) for 5 minutes to allow glue to soften
34. Push the headlight back into place, making sure the clips pop back into/over the holders
35. Put the bulbs back in and re-mount the wiring mounts
36. Re-install back into car
NOTE: When I had my headlights apart, I tinted the round clear lenses that cover the blinker light. I coated them each two times and it came out very nice. Dark to look like eyes, not too dark so that when my blinker is on, they don't "shine".
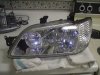
Now to the add on stuff from me: I know alot of people have had the concerns about leakeage and fogging. After reassembling my entire headlight housing together and heating it up and getting the glue back together i went and purchased Aquarium Sealant, silicone. I followed all the edges with the silicone and sealed up any "possible" areas that i was unsure about. Ever since i did that no leaking nor fogging and i tested it last night. I spent roughly a good 6-7 hours doing the entire project, so be prepared for some time down. here come the pics...
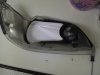
This is my headlight before going into the oven, notice the towel, i moistened the towel in water to keep the towel from burning and the metal melting the plastic on the headlight.
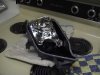
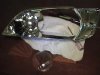
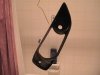
These two pictures are the headlight casing seperated, I allowed the headlights to sit in the oven for 6-7 minutes on 275degrees, again, pry the casing apart slowly. The grey stuff on the lining of the casing is the GLUE that holds the lights together.
Though there are difference since some people have older models and what not but i did try it on my friends
old stock lights for his 2006 lancer and worked
1. Pop the hood, remove 3 bolts per headlight. These are 10mm bolts.
2. Unplug the headlight bulbs
3. Pull headlight housing out and take inside
4. Pre-heat your oven to 160-180*C
5. Clean the headlight lenses
6. Remove all bulbs, unscrew and remove the wiring mounting brackets, set in safe place
7. Get a cookie sheet, grab a medium sized towel, make it moist with water, and place it on cookie sheet
8. After removing ALL bulbs from HL, stick on cookie sheet
9. Place cookie sheet with HL on it in oven for 5-6 minutes (not much more, one HL at a time)
10. Use oven gloves to remove cookie sheet
11. Gently bend the "clips" surrounding the housing upwards (they are black little over clips, which hold in the clear plastic, you will see them).
12. Pull the clear plastic away from the back housing, I used a screw driver and CAREFULLY/slowly pried small parts away around the housing and then pulled apart
13. Repeat steps 8-12 for 2nd headlight
14. Remove the inner chrome piece from the clear part of the headlight. You will need to unscrew 2 screws with a Phillips screw driver
15. You will see a clear plastic circle thing in the housing (blinker light cover). GENTLY remove this by pushing the clip on the top down. Be CAREFULL. I broke one of mine (this IMO is the hardest part of this project)
16. Sand the chrome housing somewhat with 400grit sand paper. This helps the paint stick (OPTIONAL)
17. Find a place to paint
18. Coat the chrome housing with black primer. Spray lightly, you will spray this 3 times total with primer
19. Let sit 15 minutes
20. Re-spray with primer
21. Let sit 15 minutes
22. Re-spray with primer
23. Let sit 15 minutes
24. Spray with the color you have chosen. Most do black, I did a gunmetal metallic flake
25. Let sit 15 minutes
26. Re-spray with color
27. Let sit 15 minutes
28. Re-spray with color
29. Let the light dry for a few hours in a warm area
30. After drying, re-insert the clear plastic circle thing in the housing, this should 'pop' back into place
31. Put the painted pieces back in the clear housing, re-screw them into place.
32. Stick the back housing and the clear part back together, get it lined up as close as possible
33. Stick back in oven (on cookie sheet) for 5 minutes to allow glue to soften
34. Push the headlight back into place, making sure the clips pop back into/over the holders
35. Put the bulbs back in and re-mount the wiring mounts
36. Re-install back into car
NOTE: When I had my headlights apart, I tinted the round clear lenses that cover the blinker light. I coated them each two times and it came out very nice. Dark to look like eyes, not too dark so that when my blinker is on, they don't "shine".
Now to the add on stuff from me: I know alot of people have had the concerns about leakeage and fogging. After reassembling my entire headlight housing together and heating it up and getting the glue back together i went and purchased Aquarium Sealant, silicone. I followed all the edges with the silicone and sealed up any "possible" areas that i was unsure about. Ever since i did that no leaking nor fogging and i tested it last night. I spent roughly a good 6-7 hours doing the entire project, so be prepared for some time down. here come the pics...
This is my headlight before going into the oven, notice the towel, i moistened the towel in water to keep the towel from burning and the metal melting the plastic on the headlight.
These two pictures are the headlight casing seperated, I allowed the headlights to sit in the oven for 6-7 minutes on 275degrees, again, pry the casing apart slowly. The grey stuff on the lining of the casing is the GLUE that holds the lights together.