CE Lancer Short Shifter Install

ThaHarvester

New Member
This has been solved! Look down below for the solution to this pesky issue :)

Hey folks,
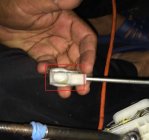
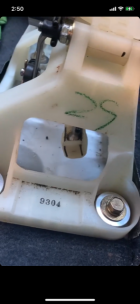
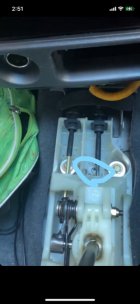
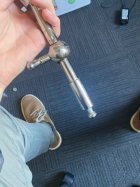
Just wondering if anyone has found any good short shifters around for a fairly decent price. I recently bought a short shifter off eBay for my car, but when I went to install it there were a few issues with it. The ball joints + cups from the factory shifter moved freely around, and the cups slid in and out of the shifter linkages easily when I took the shifter out. The cups were also firmly clipped around the ball joints. However the aftermarket one seemed to be very poorly engineered - the cups were very stiff on the ball joints (even when I greased em' em), and the cups had to be jammed into the shifter linkages, and were very hard to extract once they were in place. Moreover, and I would like to know if anyone else has had this issue - when shifting into 3rd and 5th gear, the shifter seemed to over-extend and simply popped out of the cup (this is the lower linkage I am talking about). Obviously - not good. I am glad I was not driving when this happened, otherwise it would have rendered the car undriveable. I had to remove the shifter (which was a task itself as the cups were jammed into the shifter linkages due to seemingly poor design). I'll attach the link to the eBay listing however most of the short shift kits seem to be the same. Also (sorry this is a bloody long post), there were two positions where the shifter shaft could be bolted down with a grub screw to the main ball pivot - I imagine to adjust the throw of the shifter. However when I attempted to use the upper position on the shaft (which I believe would shorten the throw), the bottom shifter linkage was hitting against the main shifter body/brace, as the linkage was being pushed down further than usual. Is this just very poorly engineered or am I missing something - I don't understand how they could get this so wrong in so many ways . . .

The images I have seem to be too large to upload - if people want them for reference I will downscale them and upload them.
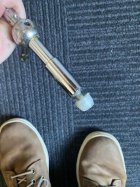
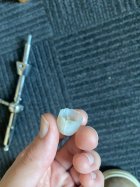
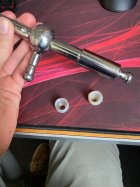
 
Last edited:
Thank short shifter link you posted is the best bang for your buck and I ran that type on my CE and my Evo without issues and heaps of other people use them here too, its best to have your car in neutral when you start so you get a bit more freedom with the cables.

If you had to force it then It sounds like it may of been installed wrong rather than an engineering oversight but that same shifter is made/sold by lots of people so anyone's guess, the ebay gamble lol

Do you still have the metal U pin that held in the ball joints originally? it should of just been slide the pin out, pop out the old joint, pop in the new one and put the clip back.

Just doublecheck the pivot point on the shifter to make sure thats sitting correctly as that will orientate the whole thing.

Keen to see the pictures if you have them as we might be able to spot something out of the ordinary, just use the 'Attach' button at the bottom of the page or just resize them in MSpaint and try to re-upload
 

Attachments

  • ZUIXniW.jpg
    ZUIXniW.jpg
    435.3 KB · Views: 4
Thank short shifter link you posted is the best bang for your buck and I ran that type on my CE and my Evo without issues and heaps of other people use them here too, its best to have your car in neutral when you start so you get a bit more freedom with the cables.

If you had to force it then It sounds like it may of been installed wrong rather than an engineering oversight but that same shifter is made/sold by lots of people so anyone's guess, the ebay gamble lol

Do you still have the metal U pin that held in the ball joints originally? it should of just been slide the pin out, pop out the old joint, pop in the new one and put the clip back.

Just doublecheck the pivot point on the shifter to make sure thats sitting correctly as that will orientate the whole thing.

Keen to see the pictures if you have them as we might be able to spot something out of the ordinary, just use the 'Attach' button at the bottom of the page or just resize them in MSpaint and try to re-upload
Appreciate your reply! So yes, the metal U pin was still there holding the factory ball joints in. However I believe the pin is holding the ball joint cups in, and the cups for the aftermarket shifter seem to have a lesser grip/hold on the ball joint, which pops out when the shifter linkage is extended. The first photo is the photo with the stock shifter back in place - you can see the U clip there, holding the cup in place. The second photo I have done some crafty editing to show roughly where that linkage is hitting against the shifter base which restricts me from using the more extreme throw on the shifter. Then I've just attached a lot of images of the shifter itself, a photo of the cup that I had to destroy to rip out, and a photo of the shifter with the other cup from the upper ball joint that I was able to salvage. I thought the cups might be mismatched, so I put the top cup which is in good condition on the lower ball joint and still the cup was easily able to pop off the ball joint, which is the ultimate issue here I believe.
 

Attachments

  • IMG_9674.PNG
    IMG_9674.PNG
    862.7 KB · Views: 16
  • InkedIMG_9675.jpg
    InkedIMG_9675.jpg
    54.3 KB · Views: 17
  • IMG_9669 (1).jpg
    IMG_9669 (1).jpg
    59.7 KB · Views: 15
  • IMG_9670 (1).jpg
    IMG_9670 (1).jpg
    76.9 KB · Views: 11
  • IMG_9671 (1).jpg
    IMG_9671 (1).jpg
    58 KB · Views: 11
  • IMG_9672.jpg
    IMG_9672.jpg
    67.1 KB · Views: 12
If you use this shifter on its tallest position ( OR longest extended position under the ball) you need to cut out a rectangular shaped relief from the housing to allow proper movement of the right hand cable. pretty starting where you've scribbled in blue. It will 100% better and smoother once you do.

try using the OEM white cups on the ebay shifter...might need a trip to the wrecker for spares.
Yes, I was thinking of taking a trip to the wreckers for these parts. I did try taking the cups of the factory ones but they seemed intent on hanging on. I did try cut out a hole in the shifter but I couldn't figure out how to unclip the shifter linkages from the shifter base (I can see how they are clipped in it is just a bit of an effort to get them out). I think I'll try the wreckers first and try pull those little cups to see if they fit (do you know if they will?) and then try extract the shifter base and cut out a nice hole. Thanks for the advice!
 
What i did, and im not sure if you did this, but the ball joint cups that were provided in the eBay kit I found to be kinda crap, and just looked poorly made and were a different size to the original cups. So, I just used the original cups for both the bottom ball joint cup and the left hand side ball joint cup on the new shifter arm. Yes the ball joints on the new arm are of larger diameter and it'll take a bit of force to put the old cups on, but once you get both on itll just work and feel much crisper. Maybe this might solve ur problem? Idk hope this helps in anyway
 
What i did, and im not sure if you did this, but the ball joint cups that were provided in the eBay kit I found to be kinda crap, and just looked poorly made and were a different size to the original cups. So, I just used the original cups for both the bottom ball joint cup and the left hand side ball joint cup on the new shifter arm. Yes the ball joints on the new arm are of larger diameter and it'll take a bit of force to put the old cups on, but once you get both on itll just work and feel much crisper. Maybe this might solve ur problem? Idk hope this helps in anyway
Yeah they seem very poorly made, I agree. I will hop down to the wreckers tomorrow and see how they fit up - it sounds like from all responses the cups should fit up to the aftermarket one no trouble. I'll update everyone tomorrow.
 
Alrighty folks - after a long day I can say that I have been able to successfully install the short shifter into my car! I will provide the steps I took so that anyone looking to do the same thing can follow along. Apologies for a lack of photos - I didn't think I would make a post this in depth.

Also note - I did not use the counterweight piece that came with the kit ias it was not going work with the shift knob I have, it may or may not work for you depending on what knob you have - I don't think the counterweight will work with the stock shift knob.

1.
First things first, the aftermarket ball joint cups are horrible. Switch them out for the factory cups like was discussed above. I went to the junkers and pulled a few out as they break quite easily, I managed to break one while I was out getting them. You could use the original ones that come with the car but be careful - its nice to have spares anyway.

2.
Next, dissassemble the center console of your car. Very easy, all thats needed is a medium sized phillips head. You will need to unclip the radio/din surrounding panel to access two screws securing part of the center console. Remove the two panels that make up the center console and that will give easy access to the shifter and surrounds.

3.
Using an 8mm allen wrench and 12mm socket remove the bolt holding in the spring and upper shifter pivot linkage. Make sure the numerous washers on the bolt don't fall down the side of the carpet (it happened to me don't let it happen to you) because you'll never see the bugger again. Then using a 10mm socket and 10mm wrench take off the other bolt and nut holding the upper part of the main pivot joint cup. Make sure not to lose the little rubber fitting on the end of the bolt.

4.
Pop off the top of the main pivot joint cup. Before taking out the factory shift column, make sure to unclip the U clip holding the lower ball joint into the lower shifter linkage. This can be done by spreading apart either end of the U clip and pushing it off. The lower ball joint cup should simply slide out, letting you extract your shift column. Also pop the steel retaining clip that connects the upper linkage to the left hand side shift linkage.

5.
Now comes the time for you to make a choice - do you want the hotboi hectik short shift throw, or a mildley reduced shift throw? There are two points on the aftermarket shift column that you can choose to screw the main pivot point down to. For the true hotboi throw, choose the upper of the two points, and if you want a subtly reduced throw, choose the lower point. This effectively changes the ratio of the distance the upper part of the shift column moves in regards to the lower part of the shift column. Make sure to torque that grub screw down on the shifter shaft - you don't want that coming loose. The thing that you must note is, for the hotboi shift throw you want, you need to perform some JDM sacrilege. If you want the minorly reduced shift throw, skip to step 8.

6.
For hotboi, you need to unscrew the four bolts holding the white shifter base down. From memory this is a 12mm socket size. Rubber washers hold this in place, when you unscrew all sides, pull out the metal inserts from the bottom side of the shifter base, and then squeeze out the rubber washers - they are wedged in pretty good. Now it is time to whip out the knife. I would reccomend finding a gas stove or blowtorch to heat a knife, otherwise the following task can be arduous/dodgy. You need to cut a large section out of the shifter base to allow the linkage to move through its new and lower motion, due to lower part of the shift column being effectively longer. When you are cutting this out, make sure to avoid the large holes where the washers sit in. I reccomend flipping the shifter base on it's side/upside down if the linkages are flexible enough, which will give easy acess to the area I'm talking about. Avoid stressing out the shifter base (using pliers or other tools to bend and break the plastic), as the plastic is very brittle, and be careful not to damage the linkages with the tools you are using.

7.
Take off the two aftermarket ball joint cups from the short shifter, and fit two the factory cups. Remember to use grease in the ball joints (no not WD40). This will ensure the shifting isn't stiff and won't wear out after hammering through the gears after a few drives. Test fit the short shifter in the lower shift linkage. You will notice that when going from 1st to 2nd and 2nd to 1st gear, the lower shift linkage hits against the chassis of the car. Don't worry about solving this yet, we will deal with it later. All that matters right now is that the linkage isn't hitting against the white shifter base.

8.
If you are yet to unscrew the white shifter base, do that now. Use a 12mm socket. Take out the rubber washers by pulling out the metal inserts from the underside of the shifter base with pliers. Take the 4 counterbored thicc metal washers and fit them up underneath the shifter base such that the base is raised from the chassis of the car. If you are using the eBay listing linked, it should also come with 4-5 slimmer washers. Place these on top side of the shifter base, and then screw the shifter base back down. If you are yet to prepare your short shift column, do that by taking off the two white ball joint cups that came with the shifter, and chuck the two factory cups on. Please use grease, don't be a numpty (no don't use WD40). Also lubricate the main pivot point to allow it to move nice and freely. Put the shift shaft back in place in the shifter base, and slide the lower ball joint cup into the lower shift linkage.

9.
Hotboi only: As mentioned before, going from 1st gear to 2nd gear, the lower linkage brushes against the chassis of the car. To solve this problem, there are two possible solutions. Use a knife to trim some plastic off the lower linkage so that it clears the chassis, or hammer in the metal of the chassis. As bad as it sounds, I choose to hammer the chassis of the car *gasp*. I took a flat head screwdriver and a hammer, located the point where it brushed against the chassis, and lightly tapped it like the expert panel beater that I am until it brushed no longer. Problem solved! Or trim the plastic of the shift linkage . . . I really don't care which.

10.
Put the U clip back around the lower shift linkage, and ensure that the lower ball joint cup is kept in place by the clip. Then, reassemble everything! Put the main pivot joint cup piece back over top of the shifter, put the bolts back through to hold the cup piece on. The assembly holding the spring and upper shift linkage can be a total bastard to get in place - persist with it, I believe in you. It is important that the upper ball joint cup slides in place into the upper linkage. It takes coordination of a lot of elements, I would recommend recruiting help but it can be done alone. Make sure everything is torqued down appropriately. Reattach the steel retaining clip that holds the upper linkage to the left hand side shift linkage in place. Run through the gears before buttoning everything up. Then button everything up. It's very easy.

I'll try answer questions - I bet I missed some steps. But hopefully this helps at least one person. Thanks for everyone's advice :) it shifts amazingly now - feels precise and exact and very, very short.
That was an awsome step by step. What your calling the hotboi iv been calling the stage 3 short shifter. I just did it today and with the metal bushings and washers raised the frame up to gain clearance. My question is if you had to deal with the little ball bearings where the ball of the stick bolts between the plastics. Mine have gone cube and are not playing well with the "billet stainless steel" chrome plated chinesium ebay shift
 
Back
Top